The need for self-hosted object storage on local servers is increasingly common in a sysadmin's workflow: database backup targets, application media repositories, and CI/CD artifacts. For years, MinIO was the default answer to that requirement. After upstream closed its community edition and stripped down its web console, many deployments already running in production lost their official update path. Silo emerges as a community fork taking over that role, complete with a fully restored console. This article explores what Silo is, the reasons behind its forking, hands-on installation on a single Linux server using Docker Compose and Nginx, and migration paths for those already running MinIO.
1. Silo and Its Position
1.1 Definition of Silo
Silo is an S3-compatible object storage server released as free software and maintained by Pigsty. Its name is an acronym for S3 Interface Libre Object storage. Silo is not a project written from scratch, but rather a fork of MinIO continued independently after MinIO's community repository was archived. Its baseline comparison is the upstream code as of December 3, 2025, making this project relatively young.
Silo's position in the ecosystem is clear: a successor to MinIO's community track, not a new commercial product. Its license remains AGPLv3, identical to upstream, and the maintainers state they do not use that license as a commercial lever. Pigsty itself uses Silo in production as a PostgreSQL backup target, meaning the releases they publish are actively used by the maintainers themselves.
Note that Silo is neither affiliated with nor supported by MinIO, Inc. Protocol and format compatibility are maintained as far as possible, but organizational alignment between the two is distinct and separate.
1.2 Key Advantages of Silo
Three core features make Silo appealing to sysadmins already running on MinIO.
- S3 compatibility treated as a strict contract. Silo retains the S3 API,
MINIO_*environment variables, metrics,x-minio-*headers,/minio/*routes,arn:minio:*namespace policies, and on-disk data formats including the.minio.sysdirectory. Existing data volumes can be used directly without renaming. - Fully restored web console. The management interface previously stripped by upstream is revived, covering bucket management, identity, policy, monitoring, and site replication.
- Ready-to-use release artifacts. Prebuilt binaries, RPM/DEB/APK packages, and multi-architecture container images for
linux/amd64andlinux/arm64are available, complete with SHA-256 checksums, SBOMs, and Sigstore signatures.
This drop-in replacement nature serves as its main selling point, though official documentation carefully labels it a conditional drop-in replacement. Most applications using standard S3 APIs can transition without code changes, but eight key areas should still be audited based on your specific deployment layout. Chapter 8 covers this migration checklist.
2. Background of the Fork
2.1 Reasons for Leaving Upstream
The fork did not originate from technical preference, but from operational necessity. The Silo Manifesto highlights three concrete triggers: stripping features from the web console, discontinuing prebuilt binary distributions, and archiving the MinIO community repository.
For sysadmins, these three factors led to one single problem: active production clusters lost their official security update path. Data remained safe on disk, but CVE patches could no longer be pulled without building directly from source. The sustainability of free software at the storage layer is not merely about idealism; it is about who patches security vulnerabilities six months down the line.
Interestingly, Silo positions itself as a pragmatic fork rather than a permanent rival. Maintainers stated they will narrow the scope of the project and offer their fixes back upstream if MinIO restores its community edition.
2.2 Commitment of the Silo Manifesto
The Silo Manifesto locks in several promises worth reading before placing production data onto the platform.
- Compatibility contract. APIs, environment variables, and on-disk formats are preserved. Every release documents its rollback targets, and new features do not alter storage formats unless explicitly marked as non-reversible.
- Unchangeable license. AGPLv3 without a CLA. No single entity holds sufficient copyright ownership to execute a unilateral relicensing.
- Disciplined changes. Only four categories of changes are accepted: security fixes, bug fixes, community feature restorations, and optional additions. Breaking API changes are made strictly for security reasons.
- Permanent prohibition list. The project promises never to lock existing features behind paywalls, require registration for downloads, send telemetry, demand a CLA, change licenses, or weaponize trademarks.
On the security front, Silo publishes public advisories detailing affected versions and reproduction steps rather than brief release notes. Upstream phone-home paths have been removed, including SUBNET callhome mechanisms and auto-updates.
3. Architecture and Hardware Requirements
3.1 SNSD and SNMD Topologies
Before installing, you need to select a topology. Two terms common in the MinIO ecosystem that remain relevant in Silo are SNSD and SNMD.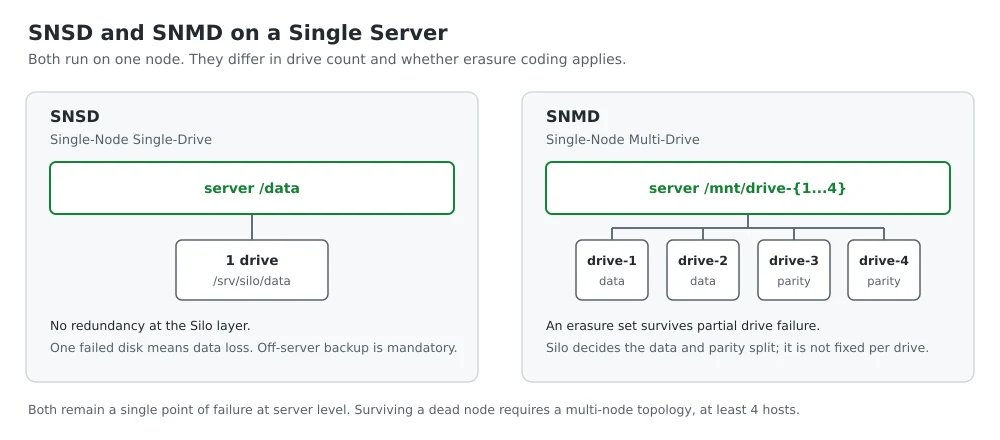
Single-Node Single-Drive (SNSD) runs a single server process on top of a single drive or directory. This mode is simple and ideal for home labs, development environments, or small-scale backup targets. The trade-off is clear: there is no redundancy at the Silo layer, meaning data integrity depends entirely on the underlying disk and off-server backups.
Single-Node Multi-Drive (SNMD) runs a single node with multiple dedicated drives. Silo groups these drives into erasure sets and applies erasure coding, allowing objects to remain readable even if some drives fail. At maximum parity configuration, EC:8 splits objects into 8 data blocks and 8 parity blocks distributed across all drives. This mode tolerates disk failures, but not node failures: a failed motherboard still brings down the entire service.
Multi-drive configurations use range notation in server arguments, such as server /mnt/drive-{1...4}, where each drive is attached as an individual mount point inside the container.
An important note from the official documentation: for production environments requiring uninterrupted availability during node failures, Silo recommends planning a minimum of 4 hosts with uniform specifications. The single-server container deployment covered in this article is explicitly intended for development and evaluation rather than multi-node production topologies. Other setups remain possible, but operational risks must be mitigated with off-server backups.
3.2 Port and Layer Separation
Silo splits traffic across two separate ports, a separation that dictates our Nginx proxy design.
- Port
9000serves the S3 API. This endpoint is used by applications, SDKs, and CLI tools. - Port
9001serves the web console. This port is explicitly assigned using the flag--console-address ":9001". Without this flag, the console uses a random dynamic port on every startup, complicating reverse proxy setups.
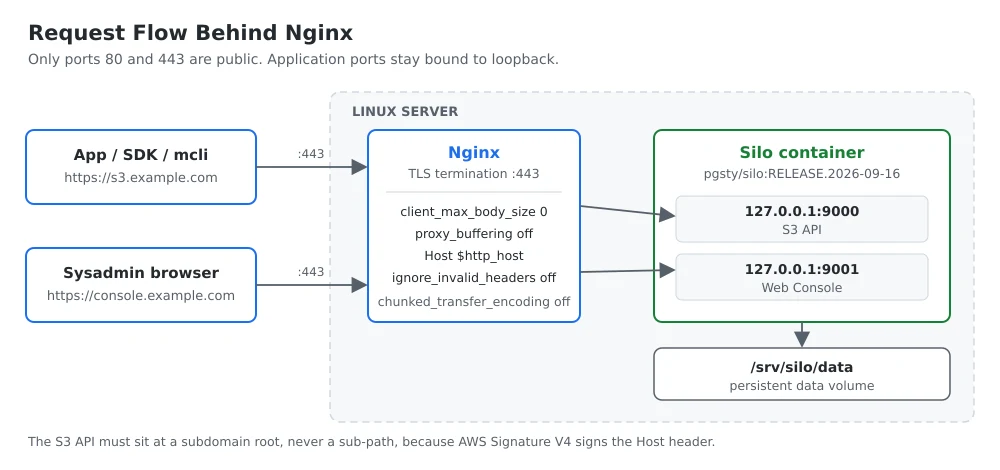
Nginx sits in front as a third layer handling TLS termination and domain-based routing. This three-tier design allows the Silo container to listen on localhost while external clients communicate exclusively with Nginx.
Note that port separation is not access boundary separation. The console and S3 API share the same identity model, so restricting one at the network layer does not automatically secure the other.
3.3 Hardware Requirements
Silo's official documentation outlines baseline requirements for production deployments across bare-metal and virtual host setups. The table below summarizes these key guidelines.
| Component | Minimum | Recommended |
|---|---|---|
| Dedicated bare-metal or virtual host | 4 hosts | 8 hosts or more |
| Drives per server | 4 drives | 8 drives or more |
| Network | 25GbE | 100GbE |
| CPU per host | 8 CPUs or vCPUs | 16 CPUs or vCPUs and above |
| Available memory per host | 32 GB | 128 GB and above |
Memory requirements scale with the total storage capacity managed by a host, not just concurrent request volume.
| Total storage per host | Recommended Memory |
|---|---|
| Up to 1 TiB | 8 GB |
| Up to 10 TiB | 16 GB |
| Up to 100 TiB | 32 GB |
| Up to 1 PiB | 64 GB |
| Greater than 1 PiB | 128 GB |
Network bandwidth is often the primary performance bottleneck rather than CPU. Concurrent request handling capacity is bounded by memory, roughly estimated as totalRam / ramPerRequest. Documentation provides reference tables mapping drive counts and free RAM to maximum concurrent requests, ranging from ~1,074 concurrent requests on a 4-drive setup with 32 GB RAM to ~17,190 requests on a 4-drive setup with 512 GB RAM. These values serve as initial baselines rather than replacements for real-world load testing.
The tables above target distributed production clusters and are excessive for a single-server SNSD lab setup. As a practical rule of thumb, a single SNSD instance for small-scale media storage or backups runs comfortably on 1 to 2 CPU cores with 1 to 2 GB RAM, while 2 to 4 cores with 4 to 8 GB RAM offers headroom for parallel uploads. Benchmark these metrics under actual application workloads, as official docs do not define single-node baselines.
The following storage prerequisites apply across all deployment scales:
- Silo requires exclusive access to its attached drives or storage volumes. Do not share data directories with other processes or edit storage files directly.
- Documentation strongly recommends XFS-formatted drives mounted as JBOD, without underlying hardware/software RAID or pooling layers. Erasure coding handles data redundancy, so underlying RAID adds write overhead without tangible benefit.
- Silo cannot guarantee data consistency over NFS or network-attached storage architectures. Use local disks.
For the software layer, you need Linux (Ubuntu, Debian, or Rocky Linux), Docker with the Compose plugin, Nginx, and a domain or subdomain pointing to your host. Examples in this guide use Ubuntu Server 26.04 LTS and Silo version RELEASE.2026-09-16T00-00-00Z. Update release tags as appropriate for your deployment.
Get $25 DigitalOcean Credit
Claim $25 Credit4. Docker Compose Installation
4.1 Installing Docker Engine
Servers without Docker Engine can use Docker's official installation script. This script detects the distribution, adds official repositories, and installs the engine along with the Compose plugin in a single execution path.
Download the installation script and perform a dry run to inspect changes without applying them:
curl -fsSL https://get.docker.com -o get-docker.sh
sudo sh ./get-docker.sh --dry-run
The
--dry-runflag prints the execution plan. Auditing scripts before executing them as root is a recommended operational standard, especially for remote scripts.Execute the installer:
sudo sh get-docker.shEnable and start the Docker system service:
sudo systemctl enable --now dockerVerify Engine and Compose plugin versions:
sudo docker version
sudo docker compose version
Docker provides warnings regarding this installer script that are relevant for production environments. The script requires root access, installs dependencies non-interactively without prompting, offers minimal parameter customization, fetches the latest stable channel (which may trigger unplanned major version jumps), and is not designed to upgrade existing installations. Upgrading existing Docker setups should be handled via the system package manager.
Docker commands require root privileges by default. Adding users to the docker group bypasses sudo, but grants root-equivalent permissions since users can mount arbitrary host paths into containers. This guide uses sudo explicitly across all Docker operations.
4.2 Data Disk Provisioning
Object storage should reside on a dedicated data disk isolated from the system root drive. This separation prevents runaway storage usage from filling the root partition and crashing system services, while allowing independent disk capacity scaling. The following procedure uses a 100 GB volume attached to a cloud server, identified as /dev/sda.
Identify attached block devices and mount points:
lsblkSample output from our target node:
NAME    MAJ:MIN RM  SIZE RO TYPE MOUNTPOINTS
sda       8:0    0  100G  0 disk
vda     253:0    0   25G  0 disk
├─vda1  253:1    0 23.9G  0 part /
├─vda13 253:13   0 1023M  0 part /boot
├─vda14 253:14   0    4M  0 part
└─vda15 253:15   0  106M  0 part /boot/efi
vdb     253:16   0  488K  1 disk
Parse device details from system drives upward. Disk
vda(25 GB) is the OS root disk hosting/,/boot, and/boot/efipartitions. Diskvdb(488 KB) is a cloud metadata device that must remain untouched. Devicesda(100 GB) lacks partitions or mount points, identifying it as our target device.Check for existing filesystems on the target device:
sudo wipefs /dev/sdaRunning
wipefswithout flags inspects detected signature magic bytes without altering data. Empty output confirms an unformatted drive. If signatures appear, verify device paths before proceeding.Install partition management tools and XFS utilities:
sudo apt install parted xfsprogsThe
xfsprogspackage suppliesmkfs.xfsand related maintenance utilities. Official Silo recommendations specify XFS filesystems mounted over JBOD storage paths without underlying software RAID layers.Create a GPT partition table and allocate a single partition spanning the entire drive capacity:
sudo parted /dev/sda --script mklabel gpt mkpart primary xfs 0% 100%Using
0%and100%boundary parameters ensures aligned partition sector offsets automatically. The termprimaryfunctions as a label in GPT tables.Verify partition creation and confirm device
sda1exists:lsblk /dev/sdaFormat the newly created partition with XFS:
sudo mkfs.xfs /dev/sda1This command erases data on the target partition. Double-check device strings prior to execution to avoid formatting system drives.
Create a mount point and mount the partition:
sudo mkdir -p /srv/silo
sudo mount /dev/sda1 /srv/silo
Confirm successful mount state and filesystem parameters:
df -hT /srv/siloThe output type column must display
xfswith usable capacity matching disk specs (~100 GB).Retrieve the persistent UUID signature for partition identification:
sudo blkid -s UUID -o value /dev/sda1Device naming schemas like
/dev/sda1can shift across kernel reboots or hardware adjustments. UUID identifiers remain static and should be used in mount configurations.Configure persistent automounting in
/etc/fstab. Append the target mount string using the generated UUID:sudo nano /etc/fstabUUID=replace-with-actual-uuid-from-blkid /srv/silo xfs defaults,noatime,nofail 0 0Validate
fstabsyntax without rebooting:sudo systemctl daemon-reload sudo umount /srv/silo sudo mount -a findmnt /srv/siloExecuting
mount -amounts all unmounted configuration entries present in/etc/fstab, surfacing formatting syntax errors immediately. Output fromfindmntreflecting/dev/sda1confirms valid configuration.
The specific mount flags configured in fstab perform key functions:
noatimedisables access time metadata updates during read operations. High-throughput object stores perform heavy reads; removing unnecessary metadata writes reduces I/O latency.nofailallows system boot sequences to complete even if storage volumes fail to initialize. This prevents unreachable instances during volume attachment delays on cloud infrastructure.- The trailing
0 0parameters disable dump backups and boot filesystem checks. XFS handles recovery internally via journaling, rendering standard boot-timefsckpasses redundant (fsck.xfsacts as a no-op stub). Manual filesystem fixes are executed viaxfs_repairon unmounted filesystems.
For SNMD deployments across multiple drives, repeat the partitioning and mounting procedure for each physical volume, establishing mapped mount points like /mnt/drive-1 through /mnt/drive-4 for container passthrough.
4.3 Directory Preparation
With the dedicated storage volume initialized, build the necessary directory tree. Keeping configuration files separate from storage volumes simplifies backup workflows and upgrades.
Create a dedicated workspace directory for Compose files on the system volume:
sudo mkdir -p /opt/siloCreate the storage path on the mounted volume to pass through to the container:
sudo mkdir -p /srv/silo/dataVerify that the target data directory resolves to the formatted storage volume rather than the root mount:
df -h /srv/silo/dataThe filesystem path should reflect
/dev/sda1. If it points to the root filesystem, the directory was created prior to volume mounting, obscuring the underlying disk path.
Inspect directory permissions using ls -ld /srv/silo/data. Ownership mismatch between host paths and interior container processes is a common cause of initial permission errors.
4.4 The docker-compose.yml File
Define service operational directives within a central configuration manifest in your working directory:
Navigate to the service configuration workspace:
sudo mkdir -p /opt/silo
cd /opt/silo
Create and edit the service file using a text editor:
sudo nano /opt/silo/docker-compose.ymlSave edits in
nanousingCtrl+O, pressEnter, and exit usingCtrl+X.
The configuration below defines an SNSD Silo container instance based on official production patterns, adjusted for standard binding ports, persistent volume paths, and health checks.
services:
  silo:
    image: docker.io/pgsty/silo:RELEASE.2026-09-16T00-00-00Z
    container_name: silo
    restart: unless-stopped
    command: server /data --console-address ":9001"
    ports:
      - "127.0.0.1:9000:9000"
      - "127.0.0.1:9001:9001"
    environment:
      MINIO_ROOT_USER: silo-admin
      MINIO_ROOT_PASSWORD: replace-with-strong-secure-password
      MINIO_BROWSER_REDIRECT_URL: https://console.example.com/
    volumes:
      - /srv/silo/data:/data
    healthcheck:
      test: ["CMD", "/usr/bin/silo", "healthcheck", "ready"]
      interval: 30s
      timeout: 10s
      retries: 3
      start_period: 2m
Key configuration elements are detailed below:
MINIO_ROOT_USERandMINIO_ROOT_PASSWORD. Silo intentionally preserves theMINIO_environment variable prefix for backward compatibility. There are no environment keys namedSILO_ROOT_USER. These parameters define the primary root administrator account; treat them as server root credentials and change defaults before initial deployment.- Pinned Image Tags. Silo releases use immutable date-stamped release tags, such as
RELEASE.2026-09-16T00-00-00Z. While floating tags likelatestexist, using explicit release tags prevents unexpected image updates during container restarts. Internal auto-update routines are disabled, making container image updates the standard upgrade path. - Loopback Binding (
127.0.0.1). Binding application ports strictly to loopback interfaces ensures S3 API and web console interfaces are not directly exposed to public traffic. Only the local reverse proxy forwards incoming connections. Direct binding avoids exposing port9000to unauthorized traffic. Note that Docker automatically modifies hostiptablesNAT chains, bypassing default UFW rules; loopback binding prevents unintentional port exposure. MINIO_BROWSER_REDIRECT_URL. Informs the console of its public URL behind reverse proxies. This must be defined when running behind proxies to prevent authentication redirects to internal local addresses. Replaceconsole.example.comwith your target domain. Console access over custom domains requires active proxy routes and SSL certificates; initial container validation uses internal health endpoints.- Volume Bind Mounts. The host path
/srv/silo/datamaps directly inside the container, facilitating host-level storage inspection and external file-level backups. Named Docker volumes offer equivalent functionality provided storage persistence is maintained. - Health Check Block. Silo embeds native health probing commands inside its distribution binaries, enabling internal status checks without external dependencies. Built-in check parameters include
live,ready,cluster, andcluster-read. A generousstart_periodprevents premature unhealthy state flags during initial disk scanning routines.
Specific legacy options are intentionally omitted. The variable MINIO_UPDATE=off appears in legacy MinIO guides, but Silo hard-codes self-update functionality off internally, making this key redundant. Additionally, distroless image variants are available (e.g., RELEASE.2026-09-16T00-00-00Z-distroless) containing only the compiled silo binary without shell environment tools. Distroless images reduce overall attack surfaces, but limit inside-container interactive debugging access.
Note on health check paths: official examples reference /usr/bin/silo. If health checks fail on running servers, verify the binary path within the active image using sudo docker compose exec silo which silo and update the path string accordingly.
4.5 Starting and Validating the Container
Execute the following commands from /opt/silo to start and verify your deployment.
Start service components in detached daemon mode:
sudo docker compose up -dCheck running container execution states:
sudo docker compose psStatus outputs must reflect active, healthy states rather than continuous restart cycles. Repeated restarts typically indicate binary
commandmisconfigurations or permission issues on attached volume paths.Inspect startup logs to verify server readiness:
sudo docker compose logs -f siloInitialization output displays bound S3 API endpoints and active web console configurations. Exit log tailing mode using
Ctrl+C.Probe the local liveness health endpoint from the host system:
curl -I http://127.0.0.1:9000/minio/health/liveA functional status endpoint returns an HTTP
200 OKstatus code. Non-200 responses indicate unready service states or listening port misconfigurations.
Silo exposes distinct health probe endpoints tailored for operational monitoring routines:
/minio/health/liveverifies if the local execution process is actively running and responsive. Use this for basic container-level liveness probes./minio/health/clusterverifies cluster-wide write quorum availability, returning an HTTP503code if quorum checks fail./minio/health/cluster/readverifies cluster read quorum status, returning HTTP503on failures./minio/health/cluster?maintenance=truechecks if removing the target node for maintenance disrupts cluster write quorum, returning an HTTP412code if quorum would be lost.
The live and ready checks validate local process conditions only. They do not guarantee overall cluster object storage availability, making cluster-level health probes and metrics monitoring necessary for production clusters.
At this stage, Silo is running locally on the host. Setting up external access requires configuring a reverse proxy.
5. Nginx Reverse Proxy and SSL Setup
5.1 Benefits of a Reverse Proxy
Deploying Nginx in front of Silo provides architectural benefits that standalone container configurations cannot easily offer.
- Centralized TLS Termination. SSL certificates are managed and renewed at the proxy layer, avoiding the need to inject certificate bundles directly into containers.
- Clean URLs Without Custom Ports. Clients access object paths over default HTTP/HTTPS ports using standardized hostnames (e.g.,
https://s3.example.com) instead of explicit port numbers. - Reduced Network Attack Surface. Public entry points are restricted to ports 80 and 443, keeping internal application ports isolated on loopback interfaces.
- Advanced Traffic Management. Provides centralized handling for global request rate limiting, client IP filter controls, and access logging.
An important operational constraint outlined in official Silo specifications must be addressed during initial routing design: S3 Signature V4 header validation routines break if S3 API services are proxied inside URL sub-paths (such as /s3/). S3 API routes must serve from root directory paths on explicit subdomains. To support this requirement, configure dedicated subdomains for each endpoint, such as s3.example.com for S3 API calls and console.example.com for management console access.
5.2 Installing Nginx and Configuring Server Blocks
Deploy Nginx from official package repositories and build the server virtual host configurations.
Install Nginx via system package management:
sudo apt update
sudo apt install nginx
Start Nginx and set the system service to launch automatically on boot:
sudo systemctl enable --now nginx
sudo systemctl status nginx
Press
qto exit active service state displays.Create a dedicated site configuration file for Silo:
sudo nano /etc/nginx/sites-available/silo.confSave content using
Ctrl+O, pressEnter, and exit usingCtrl+X. Isolating definitions inside standalone config files rather than editing/etc/nginx/nginx.confenables rapid service isolation by modifying single symlinks.
The configuration block below follows official multi-subdomain setup guidelines, streamlined for single-node deployment patterns using defined upstream blocks. Copy these definitions into /etc/nginx/sites-available/silo.conf.
upstream silo_s3 {
   server 127.0.0.1:9000;
}

upstream silo_console {
   server 127.0.0.1:9001;
}

server {
   listen       80;
   listen  [::]:80;
   server_name  s3.example.com;

   ignore_invalid_headers off;
   client_max_body_size 0;
   proxy_buffering off;
   proxy_request_buffering off;

   location / {
      proxy_set_header Host $http_host;
      proxy_set_header X-Real-IP $remote_addr;
      proxy_set_header X-Forwarded-For $proxy_add_x_forwarded_for;
      proxy_set_header X-Forwarded-Proto $scheme;
      proxy_connect_timeout 300;
      proxy_http_version 1.1;
      proxy_set_header Connection "";
      chunked_transfer_encoding off;
      proxy_pass http://silo_s3;
   }
}

server {
   listen       80;
   listen  [::]:80;
   server_name  console.example.com;

   ignore_invalid_headers off;
   client_max_body_size 0;
   proxy_buffering off;
   proxy_request_buffering off;

   location / {
      proxy_set_header Host $http_host;
      proxy_set_header X-Real-IP $remote_addr;
      proxy_set_header X-Forwarded-For $proxy_add_x_forwarded_for;
      proxy_set_header X-Forwarded-Proto $scheme;
      proxy_set_header X-NginX-Proxy true;
      real_ip_header X-Real-IP;
      proxy_connect_timeout 300;
      proxy_http_version 1.1;
      proxy_set_header Upgrade $http_upgrade;
      proxy_set_header Connection "upgrade";
      chunked_transfer_encoding off;
      proxy_pass http://silo_console/;
   }
}
These individual configuration parameters perform vital roles in traffic handling:
client_max_body_size 0;removes default HTTP upload request body size limits. Default Nginx limits are restricted to 1 MB; without adjusting this, large object upload requests are rejected with HTTP 413 errors.proxy_buffering off;andproxy_request_buffering off;force Nginx to stream payload data chunks immediately to storage endpoints without writing intermediate cache buffers to disk. This prevents multi-gigabyte uploads from filling temporary storage paths under/var/lib/nginx.ignore_invalid_headers off;ensures non-standard custom S3 HTTP header metadata keys are forwarded intact. Altering or dropping these headers invalidates calculated request authentication signatures.proxy_set_header Host $http_host;preserves the original incoming client HTTP Host header string. AWS Signature V4 authentication logic includes theHostheader key in cryptographic calculations; modifying this value results in signature mismatch rejections. Use$http_hostrather than$hostto ensure optional port numbers are retained in signed strings.chunked_transfer_encoding off;prevents Nginx from appending chunked transfer framing wrappers that alter request payload byte lengths, preserving signature match verification.proxy_http_version 1.1;paired withConnection ""on S3 locations enables persistent HTTP/1.1 keepalive connections to upstream backends without falling back to short-lived HTTP/1.0 connections.- The
UpgradeandConnection "upgrade"header directives on console locations support persistent WebSocket channels required for real-time console telemetry metrics and log tracing. proxy_connect_timeout 300;extends backend execution connection timeouts, allowing longer execution windows for intensive queries like listing buckets containing millions of keys.
Activate configurations and reload system Nginx services:
Create a active site symlink pointing into
sites-enabled:sudo ln -s /etc/nginx/sites-available/silo.conf /etc/nginx/sites-enabled/Remove default boilerplate Nginx site links to prevent misrouted request handling:
sudo rm /etc/nginx/sites-enabled/defaultRemoving this link disables default page hosting. Master template files remain preserved at
/etc/nginx/sites-available/defaultfor future reference.Validate Nginx syntax structures before reloading runtime configurations:
sudo nginx -tPerform a non-disruptive configuration reload:
sudo systemctl reload nginx
5.3 Certbot Provisioning for Let's Encrypt SSL
Ensure DNS A/AAAA records for both subdomains point to your server IP address and HTTP port 80 is publicly accessible. Certbot uses HTTP-01 challenges to validate domain control.
Install Certbot along with the Nginx extension plugin:
sudo apt install certbot python3-certbot-nginxCertbot is also packaged as a Snap bundle. Choose either standard system packages or Snap modules; avoid installing both side by side.
Request and deploy SSL certificates covering both subdomains:
sudo certbot --nginx -d s3.example.com -d console.example.comThe Certbot Nginx plugin automatically modifies your active site configurations, injecting
listen 443 ssldirectives alongside generated certificate file paths and prompting to enable automatic HTTP-to-HTTPS redirects. Enable global HTTPS redirection to prevent plain-text credential transmission.Validate modified server configurations and apply changes:
sudo nginx -t && sudo systemctl reload nginxTest automated certificate renewal routines:
sudo certbot renew --dry-runPackage installations automatically register systemd timer units for periodic renewal checks. Manual cron configurations are unnecessary. Verify active timer states using
systemctl list-timers | grep certbot.Verify that the
MINIO_BROWSER_REDIRECT_URLentry indocker-compose.ymluses thehttpsprotocol scheme, then re-apply service configurations:sudo docker compose up -d
Run a final HTTPS connection test from any terminal client:
curl -I https://s3.example.com/minio/health/live5.4 Host Firewall Rule Hardening
A reverse proxy configuration is effective only when direct access bypass routes are blocked. Restrict host network ingress to necessary operational ports.
Configure UFW access rules allowing SSH and standard Nginx HTTP/HTTPS profiles:
sudo ufw allow OpenSSH
sudo ufw allow 'Nginx Full'
Enable system firewall protections and inspect rule states:
sudo ufw enable
sudo ufw status verbose
Verify that direct public access to application ports is blocked. Run this probe from an external system:
curl -m 5 -I http://s3.example.com:9000/minio/health/liveConnection timeouts or refused responses confirm expected traffic isolation. If an HTTP
200OK status is returned externally, port9000remains publicly exposed, requiring review of internal Compose interface bindings.
The verification step above is crucial. Docker updates host network interface routing rules directly inside iptables DOCKER chains, bypassing standard UFW filtering lists. If container ports publish directly across 0.0.0.0 interfaces, services remain globally accessible despite active UFW firewalls. Explicitly binding to loopback paths (127.0.0.1) resolves this exposure risk.
6. Managing Objects via the Silo Web Console
6.1 Initial Console Authentication
Navigate to https://console.example.com using a web browser. The Silo Console provides an embedded graphical management interface with operational capabilities matching CLI tooling. Supported browsers include standard modern builds of Chrome, Edge, Safari, Firefox, and Opera (excluding Opera Mini).
The login form accepts root management credentials defined by MINIO_ROOT_USER and MINIO_ROOT_PASSWORD environment variables. When external Identity Providers (IDPs) are configured, drop-down selection options permit selecting alternative authentication flows.
Upon initial login, the console displays the default object browser interface listing accessible storage buckets. Listed buckets respect configured policy assignments, restricting limited account visibility to explicitly authorized resources.
Follow security best practices by reserving root credentials exclusively for bootstrapping administrative users and security policies, using limited-privilege identities for routine tasks. Avoid storing root keys inside long-lived application config files. The web console interface can be completely disabled by setting MINIO_BROWSER=off if deployment models require API access exclusively.
6.2 Creating Your First Storage Bucket
Buckets act as root namespace containers for storing target data objects. Bucket creation via the web UI is straightforward, but certain bucket settings must be decided up front.
- From the object browser interface, select Create Bucket.
- Specify a bucket name. Names must consist exclusively of lowercase letters, numeric digits, and hyphen characters (e.g.,
backup-postgresormedia-assets). Bucket names form part of object URL paths, so choose descriptive identifiers. - Enable Versioning if data rollback protections are required for overwritten or deleted objects.
- Enable Object Locking for compliance needs that require Write-Once-Read-Many (WORM) immutability guarantees. Enabling object lock options requires active bucket versioning.
- Configure Quota definitions to limit total capacity usage, or assign minimum retention periods under Retention settings.
- Save the configuration to make the bucket immediately available in the management list.
Important operational requirement: official specifications state that replication capabilities, object locking setups, and bucket versioning flags must be defined during initial bucket creation and cannot be toggled retroactively. Selecting incorrect options here requires creating new target buckets and migrating contents manually.
Enabling bucket versioning requires configuring matching Lifecycle Policies. Version-enabled buckets without automated lifecycle expiration policies grow continuously as file updates create new historical object versions. Configure a lifecycle rule to expire non-current versions after a defined retention window (such as 30 or 90 days).
6.3 Uploading and Managing Objects
Navigate inside a created bucket to begin uploading data payloads. Upload control buttons are located in the top-right section of the object browser interface, accepting individual files or entire folder hierarchies. Active file upload operations trigger visual progress status metrics within the top management action bar.
- Select the target bucket from the object browser list.
- Click the upload button to select local files, or choose directory upload actions to transfer full folder structures. The object browser also supports manual folder prefix creation.
- Click an individual object entry to view its details panel, displaying filename strings, payload sizes, tags, active WORM legal holds, matching retention rules, and custom object metadata headers.
The bucket management interface groups common configuration capabilities across dedicated administrative tabs:
- Summary: Inspect and update base access policies, default server encryption settings, capacity quotas, and bucket-level tag key pairs.
- Events: Configure event notifications targeting webhooks or message queues triggered on object creation, access, or deletion events.
- Lifecycle: Define policy rules for automated object expiration or tiered transitions to secondary storage classes.
- Replication: Configure server-side bucket replication synchronization targets across nodes or remote clusters.
- Access: Review identity policy assignments and user group access rules linked to the active bucket.
- Anonymous: Manage unauthenticated access policies targeting specific bucket paths or directory prefixes.
Handle Anonymous policy rules with caution. Assigning anonymous access permits public requests to download or read matching object paths without authentication credentials. Use anonymous access selectively for public assets (such as media-assets/public/) rather than entire buckets.
6.4 Generating Shared Object Presigned URLs
Sharing access to private objects without exposing entire buckets publicly can be achieved using presigned URLs. Presigned URLs embed temporary cryptographic authorization signatures directly inside access link strings, expiring automatically after a configurable duration.
To share files from the console, select an object, open its context menu, select the sharing option, and define the link expiration duration. Equivalent presigned links can be generated from command-line interfaces:
mcli share download --expire 48h silo/media-assets/q3-report.pdfKeep the following security considerations in mind when sharing presigned URLs:
- Default expiration periods default to 168 hours (7 days) if the
--expireflag is omitted. Expiration parameters accept standard duration formatting syntax (e.g.,##h##m##sor30d). - Presigned URLs grant access to any bearer during their valid timeframe. Handle generated link strings as sensitive authorization credentials.
- Appending the
--recursiveflag generates presigned links spanning all objects matching a target bucket or prefix path. - For version-enabled buckets, pass the
--version-idflag to target specific historical file versions. - Upload links can be generated using
mcli share upload, providing presigned URLs accepting HTTP PUT payload operations. This allows third parties to upload files securely without full account credentials.
For permanently public assets, such as website image files, anonymous access policies are generally preferred over generating short-lived presigned URLs:
mcli anonymous set download silo/media-assets/publicThis command enables unauthenticated public read access strictly for files under the public directory prefix. Policy parameters include upload (write-only), public (read-write), and none (revokes public access). Avoid setting global public access policies on internet-exposed buckets, as this permits unauthenticated write access. Inspect existing public policy configurations using mcli anonymous links silo/media-assets/public.
6.5 Security Settings, Access Keys, and Identity Policy Controls
The console security section provides centralized administration for generating API access key pairs, configuring user accounts, setting group memberships, authoring IAM security policies, and managing external identity providers.
Applications should authenticate using dedicated Access Key and Secret Key pairs generated for specific access scopes, rather than master root account credentials. Secret keys are displayed only once upon initial generation; store them securely in a secret manager.
Access control uses Policy-Based Access Control (PBAC) models backed by JSON policy documents modeled on AWS IAM structures. Silo includes four pre-configured policy templates: readonly, readwrite, writeonly, and diagnostics, alongside support for custom JSON policies. Follow the principle of least privilege: assign backup jobs write permissions scoped strictly to target backup buckets, avoiding broad management rights across unrelated resources.
Newly created user accounts possess no default permissions, rendering them unable to perform API operations until explicit policies are assigned or accounts are mapped into authorized groups. This default-deny behavior ensures secure user isolation, though it can be mistaken for broken authentication during initial setup.
7. Tooling Integration via mcli and Software Development Kits
7.1 Installing the mcli Utility
Pigsty maintains the official client utility under the binary name mcli. Its operational flags and command structures match MinIO's original mc utility, enabling existing automation scripts to transition by updating command invocation names.
To manually install the standalone Linux x86_64 binary, follow these steps:
Download the release archive from the official repository:
curl -fLO https://github.com/pgsty/mc/releases/download/RELEASE.2026-09-16T00-00-00Z/mcli_20260916000000.0.0_linux_amd64.tar.gzValidate the downloaded file against published SHA-256 checksums:
sha256sum mcli_20260916000000.0.0_linux_amd64.tar.gzExtract the binary package:
tar -xzf mcli_20260916000000.0.0_linux_amd64.tar.gzInstall the binary into a executable system
PATHlocation:sudo install -m 0755 mcli /usr/local/bin/mcli
Platform packages are provided across major distributions, including .deb packages for Debian/Ubuntu, .rpm for RHEL/Rocky/Alma, and .apk for Alpine Linux systems. Dedicated macOS builds (Intel and Apple Silicon) alongside native Windows binaries are available under official releases.
7.2 Generating Service Access Keys
Client tooling requires service credentials to interact with API endpoints. The Access Key acts as an identifying username, while the Secret Key acts as the authentication password. Both keys sign every outgoing request payload and must be provisioned before setting up local client aliases.
Credentials can be provisioned using two distinct methods, each carrying different operational security profiles.
The first option uses master root account credentials configured via MINIO_ROOT_USER and MINIO_ROOT_PASSWORD. While functional for initial setup, root credentials grant unrestricted administrative access across the entire cluster. Restrict root usage to initial bootstrapping and administrative configuration tasks.
The recommended approach is to generate scoped access key pairs via the web console interface. Dedicated key pairs can be revoked individually without disrupting unrelated user workflows or global service operations.
- Log in to
https://console.example.comusing root credentials. - Navigate to Access Keys and select Create Access Key.
- Allow auto-generation of key strings, or enter specific values matching local internal naming conventions. Add descriptive names detailing service scope (e.g.,
sysadmin workstation). - Set optional expiration windows for temporary access key pairs.
- Copy the generated Access Key and Secret Key strings before closing the modal dialog. Secret keys are presented once and cannot be retrieved later.
Command-line administration tools can also generate access keys, but require an active authenticated alias. To bootstrap a fresh node, register a temporary root alias, provision configured application accounts and policies as described in Section 7.5, and rebind client aliases using scoped service credentials.
Access key permission boundaries: generated child keys inherit the access permissions of the parent identity that created them. Key pairs created by the root account retain full root administrative capabilities. For application integrations, create dedicated user accounts backed by minimal policy roles first, then issue application access keys under those limited user contexts.
7.3 Managing Target Aliases and Base Operations
Once keys are generated, register a local target alias—a shortcut mapping an endpoint URL to its associated credentials. Replace placeholders in the command below with your active access key and secret key strings:
mcli alias set silo https://s3.example.com ACCESS_KEY SECRET_KEYVerify registration states and review configured aliases using the following commands:
mcli alias list
mcli ls silo/
A successful mcli ls request returning bucket lists (or an empty response on new instances) confirms valid authentication. An Access Denied response indicates correct credential syntax but insufficient policy permissions. A SignatureDoesNotMatch error points to incorrect secret key values or upstream proxy configurations, as detailed in Section 9.1.
Alias definitions are stored in local client user configuration files with clear-text secret keys. Secure client configuration file permissions on shared servers, and assign dedicated local service users for background automation jobs. To update alias credentials, re-run mcli alias set using the existing target alias name. Remove configured aliases using mcli alias remove silo.
7.4 Object Data Management Workflows
Standard data operations rely on four primary commands: creating storage buckets, uploading files, listing path contents, and retrieving objects.
Create a new storage bucket:
mcli mb silo/backup-postgresUpload a single file. A trailing slash on the target path indicates a destination bucket or directory prefix:
mcli cp dump.sql.gz silo/backup-postgres/Recursively upload an entire directory structure:
mcli cp --recursive /var/www/uploads/ silo/media-assets/Inspect remote paths, object payload sizes, and modification timestamps:
mcli ls silo/backup-postgres/
mcli stat silo/backup-postgres/dump.sql.gz
Retrieve remote objects using the same transfer command structure, as mcli cp accepts local paths or remote bucket paths interchangeably for source and destination arguments.
mcli cp silo/backup-postgres/dump.sql.gz /tmp/
mcli cp --recursive silo/media-assets/ /var/www/uploads/
mcli cat silo/backup-postgres/notes.txt
The mcli mirror command provides dedicated directory synchronization for automated backup jobs. It syncs local source paths with remote bucket targets, making it suitable for execution via cron jobs or systemd timers:
mcli mirror /var/www/uploads silo/media-assetsTest directory synchronization workflows on non-production test buckets before enabling deletion flags, as mirror routines can delete non-matching target objects to reflect source directory states. Exercise caution when running mcli rm commands, as deletions on non-versioned buckets permanently remove underlying data:
mcli rm silo/backup-postgres/old-dump.sql.gz7.5 Service Administration Extensions
The mcli admin suite handles server-level administrative operations outside standard object workflows. Constructing scoped application identities involves three execution steps.
Create a new service user account. This command takes three arguments: the cluster target alias, the target username/access key, and the secret key password:
mcli admin user add silo backup-agent 'Long-Secure-Random-Password-String'Administrative guidelines recommend using unique secret key strings over 12 characters in length containing mixed alphanumeric characters and symbols. Lost secret keys cannot be recovered via administrative inspection.
Attach security policies to the new account, as newly provisioned accounts default to zero active permissions:
mcli admin policy attach silo readwrite --user backup-agentThe
--userand--groupassignment flags are mutually exclusive. Apply multiple policies to a single user by chaining policy names sequentially.Generate short-lived access keys linked to the parent user account for dynamic application access:
mcli admin accesskey create silo backup-agent --name "daily cron backup" --expiry-duration 720hChild access keys inherit authorization limits from their parent user accounts, providing a safe mechanism for managing periodic credential rotations.
Run mcli admin info silo to retrieve global health state metrics, cluster node configurations, and disk pool statuses. On distributed deployments, this command reports operational status per individual host node.
Additional administrative subcommands include: mcli admin heal to scan for and repair corrupted object bitrot, mcli admin logs to view remote server log streams, mcli admin group to manage access control groups, and mcli admin service to trigger server restarts. The command structure follows a standardized syntax: mcli admin COMMAND ALIAS [ARGUMENTS].
Note that policy attachment commands apply to identities managed natively by Silo. Accounts managed via external OpenID or LDAP providers require provider-specific configuration workflows.
7.6 Native SDK and Integration Tooling Access
Because Silo preserves standard S3 API structures, third-party software, utilities, and application frameworks supporting S3 can connect to your deployment. Point application endpoint configurations to https://s3.example.com and set region parameters to a standard region string, typically us-east-1.
An example using the AWS CLI configured against custom Silo infrastructure:
aws --endpoint-url https://s3.example.com s3 ls
aws --endpoint-url https://s3.example.com s3 cp dump.sql.gz s3://backup-postgres/
Graphical client tools (e.g., Cyberduck) and command-line sync utilities (e.g., Rclone) follow similar setup patterns: select generic S3 compatibility modes and define target custom endpoints. Backend application stacks built on Node.js, Python, or Go can use standard AWS SDK libraries configured with custom endpoint parameters pointing to your proxy server. Silo provides dedicated SDK reference guides covering Go, Python, .NET, Java, JavaScript, Haskell, and Rust implementations.
A common configuration requirement for third-party SDKs is enabling path-style bucket addressing. Virtual-host bucket request configurations prepend bucket names to domain endpoints (e.g., https://media.s3.example.com), which requires wildcard DNS mapping and multi-domain SSL certificates. Path-style request routing places bucket names inside standard URI paths, simplifying single-certificate setups on individual server deployments.
Presigned URL generation behaves identically to standard MinIO environments, allowing application-level secure temporary link generation routines to function without modification.
8. Migration from Existing MinIO Deployments
8.1 Pre-Migration Audit Verification
Existing MinIO installations do not require exporting and re-importing stored data objects. The underlying on-disk data layouts remain identical, including internal .minio.sys system metadata structures and erasure set layouts. Existing data volumes can be mounted directly by Silo containers without data conversion processes. The migration process focuses primarily on replacing the container image.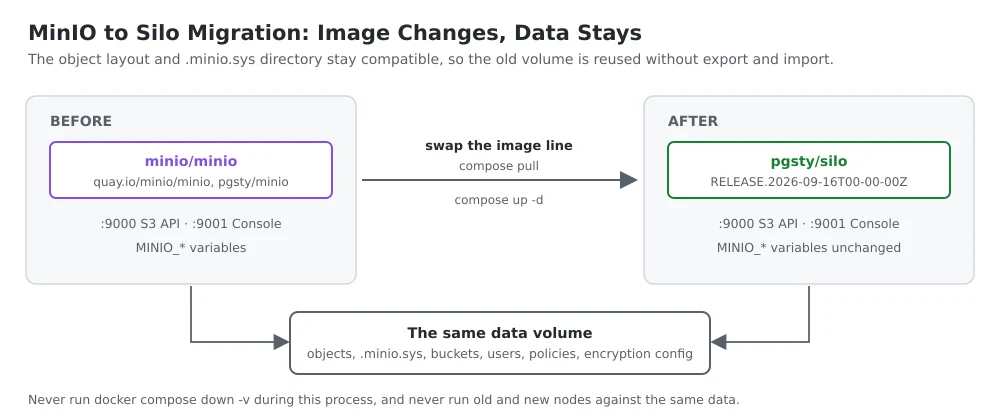
Before modifying active environments, document your current deployment baseline: record running container digest IDs, installed system packages, active systemd service units, and file ownership UID/GID values across data paths. These details provide a rollback path if unexpected issues arise during migration.
Verify cluster operational health using mc admin info against your target deployment, ensuring all nodes report active, online states. Attempting to migrate an degraded cluster with existing drive or node failures increases operational risk.
8.2 Migration Compatibility Matrix
The matrix below highlights architectural components that remain unchanged during migration versus parameters requiring explicit configuration adjustments. Use this matrix as a reference checklist before modifying production nodes.
| Deployment Aspect | Post-Migration Compatibility Status | Required Action Items |
|---|---|---|
Stored Object Payloads & .minio.sys Paths | Fully Compatible | Mount existing volumes directly; no export/import steps required. |
| Bucket States, Object Versions, IAM Policies & Keys | Fully Retained | Verify configuration state post-startup. |
| Network Hostnames & Listening Ports (9000 & Console) | Identical Parameters | None required. |
Environment Variables Using MINIO_* Prefixes | Identical Processing | None required. |
API Route Paths (/minio/*) & Headers (x-minio-*) | Identical Handling | None required. |
Policy Namespaces (arn:minio:*) | Identical Processing | None required. |
SDK Connections, mc/mcli & Presigned URL Links | Fully Compatible | Validate sample client integrations. |
| Base Container Registry Image String | Modified Identifier | Update image definitions to docker.io/pgsty/silo using release tags. |
| Binary Executable & System Package Names | Modified Identifier | Update reference binaries from minio to silo on native bare-metal paths. |
| Default User Configuration Paths | Modified Identifier | Replaces ~/.minio with ~/.silo, while respecting legacy ~/.minio/certs locations. |
| Internal Auto-Update Routines & Telemetry Callhome | Hard-Disabled | Manage future upgrades explicitly via image tag updates. |
| Custom Extensions & Internal Admin Automation Tooling | Requires Verification | Audit and test custom scripts in staging environments prior to release. |
| Branding Elements & Web Console Display Layouts | Visual UI Modifications | Adjust operational user interfaces without underlying technical changes. |
8.3 Executing Image Migration Steps
Edit your local
docker-compose.ymlfile to update the container image reference. Replace legacy registry strings (such asminio/minio,quay.io/minio/minio, orpgsty/minio) with the official image target:image: docker.io/pgsty/silo:RELEASE.2026-09-16T00-00-00ZPre-fetch the target image to minimize service interruption windows during container recreation:
sudo docker compose pullApply configuration changes to recreate running containers:
sudo docker compose up -d
Critical operational warning: never run docker compose down -v during this migration sequence. The -v execution flag deletes attached local volume stores, resulting in permanent data loss.
Cluster migration requirement: distributed multi-node production clusters must migrate all nodes simultaneously. Running mixed cluster environments containing different server binary versions will cause nodes to stall in activating state loops triggered by internal checksum mismatches. Similarly, for site replication topologies, coordinate software upgrades across all linked sites rather than updating individual sites independently without a unified maintenance plan.
8.4 Post-Migration Verification and Rollback Procedures
Container execution alone does not confirm a complete migration. Validate cluster operations by completing these four post-migration checks:
- Download a known stored object payload and verify its SHA-256 file checksum against expected baseline values.
- Execute integration test flows using an active production application connected via standard S3 SDK libraries.
- Trigger a single controlled restart of the target service container.
- Re-run object retrieval and hash checks following the restart sequence to verify persistent storage integrity.
Rolling back a migration requires preserving the original image digest IDs, retaining previous service configuration files, validating rollback compatibility, and generating complete IAM configuration backups prior to upgrading. Certain upstream releases do not support rolling back across major data format revisions; review release notes carefully for version-specific rollback guidance. Never run legacy and updated server binary versions simultaneously against the same underlying data directory.
If migrating from releases dated prior to August 6, 2026, note these five key operational behavior changes: explicit object version deletion requires the s3:DeleteObjectVersion IAM action, enabling and disabling features are split into distinct administrative actions, updated policy engines reject bare un-scoped ARN prefixes like "arn:aws:s3:::", database event notification targets require explicit connection string definitions, and per-bucket CORS rules are strictly enforced and should be configured after all cluster nodes finish upgrading.
8.5 Standard Upgrade Workflows
Upgrading Silo to future software releases follows the same basic procedure as initial migration, but requires fewer steps. Update image tag strings to target verified release versions, pull updated images, and redeploy containers using Compose commands. Internal auto-update routines are hard-disabled within Silo binaries, meaning updates are performed explicitly through container image management.
Review published release notes before deploying upgrades, paying special attention to documented rollback compatibility target versions. Save image digest hashes from previous working builds, as floating version tags can be updated upstream, making immutable digest strings necessary for reproducible rollbacks.
9. Troubleshooting and Common Error Handling
9.1 Resolving Signature Mismatch Errors
If client applications receive SignatureDoesNotMatch rejections while using valid access keys, the issue usually stems from intermediate proxy misconfigurations, as AWS Signature V4 calculations include the HTTP Host header and matching request metadata keys in cryptographic signature generation.
Troubleshoot this issue by checking these three parameters in order: verify that Nginx site configurations set proxy_set_header Host $http_host; (using $http_host rather than $host), ensure ignore_invalid_headers off; is set to prevent dropping S3-specific HTTP headers, and confirm that S3 API requests route directly from the subdomain root path rather than an internal sub-path. If these settings are correct, check system time synchronization on client and server nodes; Signature V4 authentication rejects requests with system clock drift beyond allowed skew thresholds.
9.2 Resolving HTTP 413 Payload Errors
Receiving an HTTP 413 Request Entity Too Large error during file transfers indicates an upstream proxy limitation from Nginx, rather than an issue with Silo. Default Nginx global configurations restrict incoming HTTP request body sizes to 1 MB, blocking standard object uploads.
To fix this, set client_max_body_size 0; inside your Nginx server block, as shown in Chapter 5. If 413 errors persist after applying this, inspect active Nginx configurations for nested location or server blocks overriding these settings, or check for conflicting global configuration directives in /etc/nginx/nginx.conf. If large file uploads stall mid-transfer without throwing explicit 413 error codes, ensure request and response proxy buffering directives are disabled.
9.3 Troubleshooting Console Redirection and Login Failures
If accessing the web console triggers redirection loops to internal network addresses or stalls indefinitely on the authentication page, the issue is typically caused by missing or misconfigured MINIO_BROWSER_REDIRECT_URL environment variables that do not match your public domain name.
Ensure the MINIO_BROWSER_REDIRECT_URL value matches your external browser navigation path, including the target https:// scheme and trailing slash characters, then restart the container service. If the console loads successfully but dashboard monitoring metrics fail to render, verify that Upgrade and Connection "upgrade" header directives are configured on console location blocks to support real-time WebSocket communication.
9.4 Troubleshooting Container Startup Failures
Containers that enter continuous restart loops are usually caused by one of three issues: insufficient write permissions on mapped storage directories, syntax errors in the execution command string, or path mismatches between host volume mounts and multi-drive mode target arguments.
To diagnose the failure, inspect the recent container log output:
sudo docker compose logs --tail=50 siloIf logs point to storage permission errors, verify directory ownership permissions on the host path using ls -ld /srv/silo/data and match them with the execution user context inside the container. If containers show running states but report unhealthy status checks while application endpoints respond normally to curl probes, verify the binary path configured in the Compose healthcheck definition block.
10. Conclusion
Silo offers a solution for maintaining MinIO deployments following upstream community edition changes. Its explicit compatibility commitments across S3 APIs, environment variables, and on-disk data formats allow sysadmins to transition setups by updating container image references, avoiding complex migration processes. The inclusion of a restored web console, signed release artifacts, and a AGPLv3 licensing model without CLA requirements make it a option for self-hosted object storage infrastructure. Given its relative novelty, run independent validation tests in staging environments before transitioning critical production data workloads.
Silo single-node deployments are suited for database backup targets, application media hosting, scheduled system dump repositories, and internal CI/CD build artifact storage. For larger deployments that require continuous availability during node outages, plan multi-node production topologies spanning a minimum of four independent hosts, as outlined in the official documentation.
Following installation, complete these three immediate operational tasks: construct least-privilege IAM access policies per application to avoid relying on master root credentials, enable bucket versioning alongside matching lifecycle expiration rules on critical storage buckets, and configure automated mcli mirror routines to mirror data to external backup locations. An object storage setup deployed on a single physical machine remains a single point of failure regardless of the underlying software layer.