Installing Django to the point where it can be run via python manage.py runserver on your local laptop is one thing, bringing it to a state where it is publicly accessible via a domain with active HTTPS is another process that is much more extensive. The distance between the two is filled by a series of system packages, database configurations, and multiple server layers forwarding requests to each other. This guide invites us to build that path step by step, starting from a clean Ubuntu 26.04 LTS server, installing Django 6.1 inside a virtual environment, until the application is accessible via its own domain with a secure HTTPS connection.
The stack we use: Ubuntu 26.04 LTS as the operating system, Python 3.14 with python3-venv, Django 6.1 as the framework, MariaDB 11.8 as the database, Nginx as the web server, Gunicorn as the WSGI server, and free SSL certificates from Let's Encrypt via Certbot. Before starting, ensure two things are ready: an Ubuntu 26.04 server with a non-root user having sudo access, and a domain name pointing to that server's IP address.
1. Installation of Dependencies and Environment
The first step as a Sysadmin is to ensure all base packages are available before touching Django code at all. Python 3.14 itself comes preinstalled on Ubuntu 26.04 LTS, so we only need to prepare its supporting tooling, a database server to store data, and a web server to face external traffic.
1.1 Update System Repositories
Run the following command so the package list on the server synchronizes with the latest Ubuntu repository:
sudo apt update && sudo apt upgrade -yThis command is important to run first because packages like python3-venv or MariaDB 11.8 that we will install require an updated repository definition. If this step is skipped, subsequent installations might fail or pull outdated versions.
1.2 Installation of System Packages
Ubuntu 26.04 LTS comes with Python 3.14 preinstalled as the system's default python3 interpreter, so we do not need to install it manually as in older Ubuntu versions. Only two additional package groups remain to be installed: the venv module along with Python headers for compilation, and the database server plus web server. Run the following steps sequentially.
- Install the
venvmodule and Python headers for package compilation (neither are installed automatically even thoughpython3is present):sudo apt install python3-venv python3-dev -y - Install the database server and web server:
sudo apt install mariadb-server nginx -y - Install build tools for compiling the MariaDB driver (used later during
pip install mysqlclient):sudo apt install build-essential libmariadb-dev pkg-config -y
The libmariadb-dev and pkg-config packages are often missed in older tutorials because older Python versions included loosely compatible headers. In the latest Python and MariaDB versions, the mysqlclient driver needs these header files to compile successfully from source.
1.3 Installation Verification
Check the version of each component to ensure the default system Python is indeed 3.14, the venv module is usable, and MariaDB as well as Nginx installations succeeded:
python3 --version
python3 -m venv --help
mariadb --version
nginx -v
If the four commands above return version numbers or help text without a command not found error, the base environment is ready, and we can proceed to the database phase. python3 -m venv --help specifically tests whether the venv module from python3-venv is installed, as default Ubuntu Python installations sometimes do not include this module by default.
2. MariaDB Database Setup
MariaDB needs basic security hardening and a dedicated database before Django can connect to it. This section sets up both. As a compatibility note, Django 6.1 official documentation requires MariaDB 10.11 at minimum, so the MariaDB 11.8 LTS we use here is well above that minimum threshold.
2.1 MariaDB Basic Security
Run MariaDB's default security script to set the root password, remove anonymous users, and disable remote root login:
sudo mariadb-secure-installationThe command mariadb-secure-installation has been the official name since MariaDB 10.5, replacing mysql_secure_installation used in older versions. That old name can still be called via symlink for compatibility, but in MariaDB 11.8 it is better to use its direct official name. Follow the prompts that appear: set a strong root password, answer Y to remove anonymous users, disable remote root login, remove the test database, and reload privilege tables. This step prevents attackers from exploiting loose MariaDB default configurations for brute-force attacks or unauthenticated access.
Verification: Ensure the MariaDB service is running normally, then check directly whether anonymous users and the test database are removed:
sudo systemctl status mariadb
sudo mariadb -e "SELECT User, Host FROM mysql.user WHERE User='';"
sudo mariadb -e "SHOW DATABASES LIKE 'test';"
If the last two queries return no rows, anonymous users and the test database are cleaned up. sudo systemctl status mariadb showing active (running) indicates the service is ready to receive connections from Django later.
2.2 Creating Database and User
Log in to the MariaDB prompt as root via mariadb, the official MariaDB command-line client that replaced mysql starting from version 10.2 (that old name still exists as a symlink, but is marked deprecated in recent MariaDB releases):
sudo mariadb -u root -pOnce logged in, run these four SQL commands to create a database, create a dedicated user, and grant privileges:
- Create a database with the
utf8mb4character set to support full Unicode characters (including emojis):CREATE DATABASE django_db CHARACTER SET utf8mb4 COLLATE utf8mb4_unicode_ci; - Create a new user with a strong password; do not use the root account for application connections:
CREATE USER 'django_user'@'localhost' IDENTIFIED BY 'strong_password'; - Grant full access privileges for that user exclusively to the
django_dbdatabase:GRANT ALL PRIVILEGES ON django_db.* TO 'django_user'@'localhost'; - Apply privilege changes and exit:
FLUSH PRIVILEGES;
EXIT;
Why use a user separate from root? If application credentials leak through a settings.py file accidentally committed to a public repository, an attacker can only touch the django_db database, not the entire MariaDB instance. This principle of least privilege acts as a layer of defense if other layers fail.
Verification: Log in using the newly created django_user account to ensure its password and access rights are correct:
mariadb -u django_user -p django_db -e "SELECT DATABASE();"If the command above returns django_db without access errors, credentials are valid. Test permission limits using mariadb -u django_user -p -e "SHOW DATABASES;"; it should only display django_db (and default information_schema), not all databases on the server, since django_user was only granted privileges to django_db in the previous step.
Get $25 DigitalOcean Credit
Claim My $25 Credit3. Django Project and Virtual Environment
This section sets up the project structure, isolates Python dependencies via a virtual environment, and configures Django 6.1 to connect to the newly created MariaDB database.
3.1 Project Directory Structure
Create a dedicated folder for the project outside the user home directory to keep things clean and allow permission sharing with the www-data group later:
sudo mkdir -p /var/www/myproject
sudo chown $USER:$USER /var/www/myproject
cd /var/www/myproject
3.2 Virtual Environment Initialization
A virtual environment is an isolated folder that stores Python packages specific to one project, separate from system packages. This prevents version conflicts if another Django project with different requirements is deployed on the same server.
- Create a new virtual environment named
venv:python3 -m venv venv - Activate the virtual environment:
source venv/bin/activate
The terminal prompt will change to show a (venv) prefix after activation succeeds. All subsequent pip and python commands will execute within this isolated environment.
Note that we do not need to install pip separately via apt prior to this step. The python3-venv package installed in step 1.2 includes the ensurepip module, which automatically bootstraps pip into venv as soon as python3.14 -m venv venv is executed. If python3-venv in step 1.2 was missed, creating the venv above will fail with an ensurepip is not available message. If that message appears, return to step 1.2 first.
Verification: Ensure active python and pip binaries point directly to the binary path inside venv, not system Python:
which python
python --version
pip --version
The path output from which python must start with /var/www/myproject/venv/bin/ and show version Python 3.14.x. If it still points to /usr/bin/python3, venv activation failed and packages installed in the next step will mix into system Python. Running pip --version also verifies pip was bootstrapped via ensurepip, and its path should point to the same venv folder.
3.3 Installation of Python Packages
Install Django, Gunicorn, and the MariaDB driver via pip:
pip install django==6.1 gunicorn mysqlclientmysqlclient is the official driver recommended by Django documentation to connect to MySQL or MariaDB. This driver is compiled from C and requires libmariadb-dev and build-essential installed in step 1.2, which is why system package installation order is crucial.
Verification: Confirm all three packages are installed and importable without errors. Compilation failures for mysqlclient usually surface here rather than during pip install without clear error messages:
python -c "import django, gunicorn, MySQLdb; print(django.get_version())"If this command prints 6.1.x without a ModuleNotFoundError, all three packages are ready. MySQLdb is the Python module name for the mysqlclient package. If this line fails with an ImportError related to libmariadb, libmariadb-dev from step 1.2 was likely missing when pip install mysqlclient ran, requiring a reinstall after system dependencies are complete.
Save installed package names along with their exact versions to requirements.txt once installation succeeds:
pip freeze > requirements.txtpip freeze records exact versions of all packages installed in this venv, including indirect dependencies installed alongside Django and mysqlclient. This requirements.txt file should be committed to the repository (unlike the venv folder itself) so that if the server needs a rebuild, or another Developer sets up an identical environment, running pip install -r requirements.txt works without guessing package versions. Whenever adding or updating packages via pip install, re-run pip freeze > requirements.txt to keep this file synchronized.
3.4 Creating a Sample Project
Create a new Django project in the current directory (the trailing dot in the command is important, meaning "in this current directory", rather than creating a new subfolder):
django-admin startproject myproject .startproject creates urls.py with a single default route pointing to /admin/, without a view for / (root domain). While DEBUG = True, this empty state is hidden by Django's "The install worked successfully!" demo page. However, once DEBUG is turned off in step 6.4, that demo page disappears and / returns a plain 404 Not Found. To ensure the root domain displays something meaningful in production, add a simple homepage view now. Open myproject/urls.py and replace its content with:
from django.contrib import admin
from django.http import HttpResponse
from django.urls import path


def homepage(request):
    return HttpResponse("<h1>myproject</h1><p>Django 6.1 is running normally on this server.</p>")


urlpatterns = [
    path('admin/', admin.site.urls),
    path('', homepage, name='homepage'),
]
The homepage view above is deliberately kept simple using a direct HttpResponse without a separate template file, keeping this guide focused on deployment rather than front-end development. Crucially, path '' (root) now has a registered view so its response no longer depends on DEBUG settings. Developers can replace this homepage view later with a real view rendering templates or including urls.py from another app.
3.5 Configuring settings.py
Open myproject/settings.py and adjust these three sections for production readiness.
- Add domain names or server IP to
ALLOWED_HOSTS:ALLOWED_HOSTS = ['example.com', 'www.example.com', '203.0.113.10'] - Change default SQLite
DATABASESconfiguration to MariaDB using credentials created in step 2.2:DATABASES = { 'default': { 'ENGINE': 'django.db.backends.mysql', 'NAME': 'django_db', 'USER': 'django_user', 'PASSWORD': 'strong_password', 'HOST': 'localhost', 'PORT': '3306', } } - Add static file and media directory configurations at the bottom of
settings.py:STATIC_URL = 'static/' STATIC_ROOT = BASE_DIR / 'staticfiles' MEDIA_URL = 'media/' MEDIA_ROOT = BASE_DIR / 'media'
ALLOWED_HOSTS is mandatory because Django rejects requests containing a Host header not explicitly listed, preventing HTTP Host header attacks used for cache poisoning or fake password reset links. STATIC_ROOT is also required because Nginx will serve static files directly from this folder rather than passing requests through Django, improving speed and offloading Gunicorn.
The staticfiles directory is generated automatically by collectstatic in step 3.6, but the media folder is not created automatically by Django; it only appears when a user uploads files via the application. Because Nginx is configured to point directly to this folder via an alias directive in step 5.2, create the directory now to avoid "No such file or directory" errors during permission checks in step 8.5:
mkdir -p /var/www/myproject/mediaThe example above writes the database password and SECRET_KEY directly into settings.py for simplicity, but on real production servers sensitive values should not be committed to code repositories. A safer approach is reading values from environment variables, such as os.environ.get('DB_PASSWORD'), and storing actual values in a separate .env file added to .gitignore. If settings.py has been pushed to a public repository with real credentials, treat those credentials as compromised and rotate database passwords and SECRET_KEY immediately.
Verification: Before running migrations, validate settings.py using Django's system check framework:
python manage.py checkSince Django 6.1, the check command includes database connection checks to all aliases in DATABASES (not just checking syntax as in older versions). Typos in MariaDB passwords or HOST will be caught here instead of causing vague errors during migrate. Output displaying System check identified no issues (0 silenced) indicates configuration is ready for the next step.
3.6 Application Initialization
Run these three commands in order to prepare the database schema, collect static files, and create an admin user:
- Migrate the database schema to MariaDB:
python manage.py migrate - Collect static files into the
STATIC_ROOTfolder:python manage.py collectstatic - Create a superuser account for Django admin access:
python manage.py createsuperuser
Verification: Ensure migrate created tables in MariaDB and collectstatic populated the staticfiles folder, both of which will be used by Nginx in step 5:
mariadb -u django_user -p django_db -e "SHOW TABLES;"
ls /var/www/myproject/staticfiles | head
If SHOW TABLES; shows default Django tables like django_migrations and auth_user, migration succeeded. If staticfiles is empty, collectstatic failed to find static assets or STATIC_ROOT in settings.py has a typo.
3.7 Initial Testing
Before configuring Gunicorn and Nginx, test whether Django and database connections work using the built-in development server:
python manage.py runserver 0.0.0.0:8000Access http://server-ip-address:8000 in a web browser. If the homepage view created in step 3.4 appears ("myproject" alongside "Django 6.1 is running normally on this server.") without database errors, steps 1 through 3 are complete. Stop the development server using Ctrl+C after testing, as it is unsuitable for production environments.
4. Gunicorn Setup
Django includes a development server, but it is single-threaded and not designed for production traffic loads. Gunicorn serves as the WSGI server bridging Nginx and Python application code.
4.1 Testing Gunicorn Manually
First test whether Gunicorn can run the Django application without errors:
gunicorn --bind 0.0.0.0:8000 myproject.wsgiThe format myproject.wsgi points to the application object inside myproject/wsgi.py generated by startproject. If this command succeeds and the Django site opens on port 8000, Gunicorn can run the application. Stop it using Ctrl+C, then proceed to permanent configuration using systemd.
4.2 Creating Systemd Socket and Service
Running Gunicorn manually in a terminal is impractical for production because the process dies when the terminal closes. We register Gunicorn as a systemd service that starts automatically on system boot and restarts if it crashes.
The unit name uses the prefix myproject- rather than generic gunicorn. If a Sysadmin deploys another Django app like blog on the same machine, two units named gunicorn.service would conflict since systemd only recognizes unique unit names per file. Using project prefixes gives every application its own socket, service, and log files for independent management (checking status, restarting, or stopping).
- Create a dedicated directory to store Gunicorn logs for this project, transferring ownership to the deploy user and
www-datagroup:sudo mkdir -p /var/log/gunicorn/myproject sudo chown $USER:www-data /var/log/gunicorn/myproject - Create file
/etc/systemd/system/myproject-gunicorn.socketdefining the Unix socket location:[Unit] Description=gunicorn socket for myproject [Socket] ListenStream=/run/myproject-gunicorn.sock SocketUser=$USER SocketGroup=www-data SocketMode=0660 [Install] WantedBy=sockets.targetReplace
$USERwith the non-root user matchingmyproject-gunicorn.service. Under socket activation, socket files are created directly by systemd rather than Gunicorn, so ownership is configured in[Socket]rather thanUser/Groupin[Service]. WithoutSocketMode, systemd defaults to0666, allowing any local user to read and write to the socket file.SocketMode=0660restricts access to the owner and thewww-datagroup used by Nginx to reach Gunicorn. - Create file
/etc/systemd/system/myproject-gunicorn.servicedefining execution settings for Gunicorn:[Unit] Description=gunicorn daemon for myproject Requires=myproject-gunicorn.socket After=network.target [Service] User=$USER Group=www-data WorkingDirectory=/var/www/myproject ExecStart=/var/www/myproject/venv/bin/gunicorn \ --access-logfile /var/log/gunicorn/myproject/access.log \ --error-logfile /var/log/gunicorn/myproject/error.log \ --workers 3 \ --bind unix:/run/myproject-gunicorn.sock \ myproject.wsgi:application Restart=on-failure RestartSec=5 [Install] WantedBy=multi-user.targetReplace
$USERwith the real non-root system username; do not leave the literal string$USERin the file as systemd does not resolve shell environment variables.--access-logfileand--error-logfileroute request and error logs to explicit files in the designated logging directory rather than stdout mixed into systemd journals. This simplifies debugging per-application logs and enables log rotation usinglogrotate.Restart=on-failureautomatically restarts Gunicorn five seconds after a crash.
Matching names for socket and service files (myproject-gunicorn) allows systemd to link them through socket activation: systemd creates and maintains the socket file, spawning the Gunicorn process upon the first incoming request. Gunicorn communicates over a Unix socket (rather than TCP) because inter-process socket communication on the same host is slightly faster and avoids opening extra network ports.
4.3 Starting and Enabling Gunicorn
Run these three commands to activate the systemd service:
- Reload systemd daemon configuration to register new units:
sudo systemctl daemon-reload - Start and enable the Gunicorn socket to launch on boot:
sudo systemctl start myproject-gunicorn.socket sudo systemctl enable myproject-gunicorn.socket - Verify the socket file was generated:
sudo systemctl status myproject-gunicorn.socket
ls -l /run/myproject-gunicorn.sock
If /run/myproject-gunicorn.sock exists in the output of ls, socket activation is working properly. The main Gunicorn service remains dormant until the first request arrives through the socket, typically passed by Nginx in the next step.
Verification: Before connecting Nginx, test whether Gunicorn responds over the socket:
curl --unix-socket /run/myproject-gunicorn.sock http://localhost/The curl command above sends an HTTP request directly over the Unix socket mimicking Nginx behavior. If output yields Django's HTML response, Gunicorn is ready to handle traffic. Running systemctl status myproject-gunicorn.service should confirm the service transitioned from inactive to active (running) following that first request.
5. Setup Nginx Reverse Proxy
Gunicorn is not exposed directly to the public internet. Nginx acts in front as a reverse proxy, receiving all visitor requests, serving static files directly from disk, and proxying application traffic to Gunicorn over the Unix socket.
5.1 Creating Nginx Server Block
Create a new configuration file for the project:
sudo nano /etc/nginx/sites-available/myproject5.2 Routing Configuration
Populate the file with the following directives, updating server_name to match your actual domain:
server {
    listen 80;
    server_name example.com www.example.com;

    location /static/ {
        alias /var/www/myproject/staticfiles/;
    }

    location /media/ {
        alias /var/www/myproject/media/;
    }

    location / {
        include proxy_params;
        proxy_pass http://unix:/run/myproject-gunicorn.sock;
    }
}
The /static/ and /media/ location blocks precede location / so Nginx serves static asset requests directly from the filesystem without involving Gunicorn or Django. This yields high performance: Nginx efficiently serves static files compared to executing Python processes. Remaining traffic matching / is proxied to myproject-gunicorn.sock using the proxy_pass directive.
Notice the directive used inside static location blocks is alias rather than root. The distinction is critical: root appends the full request URL path (including /static/) to the base directory path, whereas alias substitutes the matching location path segment. Using root /var/www/myproject; causes requests for /static/app.css to look for files at /var/www/myproject/static/app.css, whereas STATIC_ROOT in settings.py points to staticfiles. Misconfiguring this leads to missing CSS/JS assets (404 errors) even after successful collectstatic execution.
5.3 Enabling Nginx
- Create a symlink to
sites-enabledto activate the configuration:sudo ln -s /etc/nginx/sites-available/myproject /etc/nginx/sites-enabled - Test syntax validity before applying changes:
sudo nginx -t - Restart Nginx to apply the new site:
sudo systemctl restart nginx
If sudo nginx -t returns syntax is ok and test is successful, it is safe to reload Nginx. Never restart Nginx without testing syntax first, as syntax errors can stop the web server and drop server traffic.
Verification: Test the request chain through Nginx to Django via HTTP. Run the following checks from the server or a client reaching the server IP/domain:
curl -I http://example.com/
curl -I http://example.com/static/admin/css/base.css
The first request should return HTTP/1.1 200 OK with the HTML homepage response from step 3.4. The second request tests static file routing: returning 200 OK indicates /static/ location rules and alias paths map correctly to staticfiles.
5.4 UFW Firewall and Ports
Nginx configurations will not work if OS level firewalls block ports 80 and 443. Many cloud provider OS images enable Uncomplicated Firewall (UFW) by default with only SSH access allowed.
- Check firewall status before making modifications:
sudo ufw status - If status is
active, allow Nginx traffic profiles covering ports 80 and 443, ensuring SSH permissions remain intact:sudo ufw allow OpenSSH sudo ufw allow 'Nginx Full' - Reload rule sets and verify port access:
sudo ufw reload
sudo ufw status
If sudo ufw status displays inactive, all ports remain open and this step can be skipped initially. However, if enabling UFW later, always execute sudo ufw allow OpenSSH before sudo ufw enable to prevent locking out remote administrator access.
6. Setup Let's Encrypt SSL
The application is accessible via HTTP at this stage, but traffic between visitors and the server remains unencrypted. Certbot provisions free SSL certificates from Let's Encrypt and configures Nginx server blocks automatically for HTTPS.
6.1 Certbot Installation
sudo apt install certbot python3-certbot-nginx -ypython3-certbot-nginx is the plugin that allows Certbot to parse and edit Nginx server block configurations created in step 5 automatically, eliminating manual file editing.
Verification: Ensure Certbot and its Nginx plugin are installed correctly:
certbot --version6.2 Generating SSL Certificates
sudo certbot --nginx -d example.com -d www.example.comCertbot prompts for an email address for security notifications, requires agreement to Let's Encrypt Terms of Service, and offers automatic HTTP to HTTPS redirection. Select the redirect option so visitors using http:// are safely upgraded to encrypted connections.
Verification: Check issued certificate details and test HTTPS access and HTTP redirection behavior:
sudo certbot certificates
curl -I https://example.com/
curl -I http://example.com/
sudo certbot certificates lists covered domain names, file paths, and expiration dates. curl -I https://example.com/ returning HTTP/2 200 confirms HTTPS functionality. curl -I http://example.com/ should return a 301 redirect pointing to the https:// location header.
6.3 Testing Auto-Renewal
Let's Encrypt certificates remain valid for 90 days. Certbot installs systemd timers for automatic renewal. Run a dry run test to confirm the mechanism works:
sudo certbot renew --dry-runIf the command completes without errors, background automated renewal is configured properly without requiring manual intervention every three months.
6.4 Finalizing Production settings.py
During earlier steps DEBUG remained set to True so traceback information assisted setup troubleshooting. Now that HTTPS is active and integration is verified, turn off debug mode and enforce production security settings inside myproject/settings.py:
DEBUG = False

SECURE_PROXY_SSL_HEADER = ('HTTP_X_FORWARDED_PROTO', 'https')
SESSION_COOKIE_SECURE = True
CSRF_COOKIE_SECURE = True
CSRF_TRUSTED_ORIGINS = ['https://example.com', 'https://www.example.com']
Setting DEBUG = False is required before public launch because running DEBUG = True in production exposes sensitive application internals (source code snippets, environment variables, database structures) to any visitor triggering errors.
SECURE_PROXY_SSL_HEADER is vital when Nginx terminates SSL: traffic forwarded from Nginx to Gunicorn over Unix sockets uses standard HTTP. This setting informs Django that the original client request used HTTPS based on headers passed by Nginx (via /etc/nginx/proxy_params), preventing redirect loops or lost secure cookies.
SESSION_COOKIE_SECURE and CSRF_COOKIE_SECURE instruct browsers to send session and CSRF cookies exclusively over encrypted HTTPS connections. CSRF_TRUSTED_ORIGINS must list full origins including the https:// scheme; missing this causes Django to reject POST submissions (including admin logins) with CSRF verification failed errors under reverse proxy setups.
We do not enable SECURE_SSL_REDIRECT inside Django. HTTP to HTTPS redirects are already handled efficiently by Nginx configuration options set during Certbot setup in step 6.2.
Verification: Restart Gunicorn so modified settings.py values take effect, then test endpoints and unmapped routes to ensure tracebacks are suppressed:
sudo systemctl restart myproject-gunicorn.service
curl -I https://example.com/
curl -I https://example.com/admin/
curl https://example.com/non-existent-page/
curl -I https://example.com/ must continue returning 200 OK. Requesting /admin/ should return 302 Found redirecting to the admin login page. Requesting non-existent paths should return a clean standard Django 404 page rather than an interactive traceback screen.
7. Architecture and Request Flow
Understanding how incoming requests navigate through the system stack helps clarify how components collaborate during operations.
7.1 End-to-End Request Flow
The diagram below illustrates the journey of an HTTP request from a client browser through web layers down to MariaDB data access, alongside static asset handling that bypasses Django completely.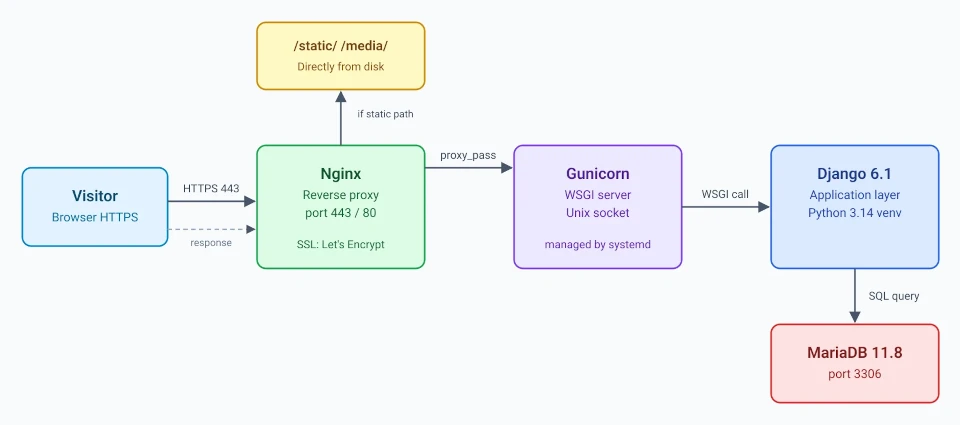
7.2 Tech Stack Layers
The second diagram presents stack architectural responsibilities ranging from external client connections down to the base operating system platform.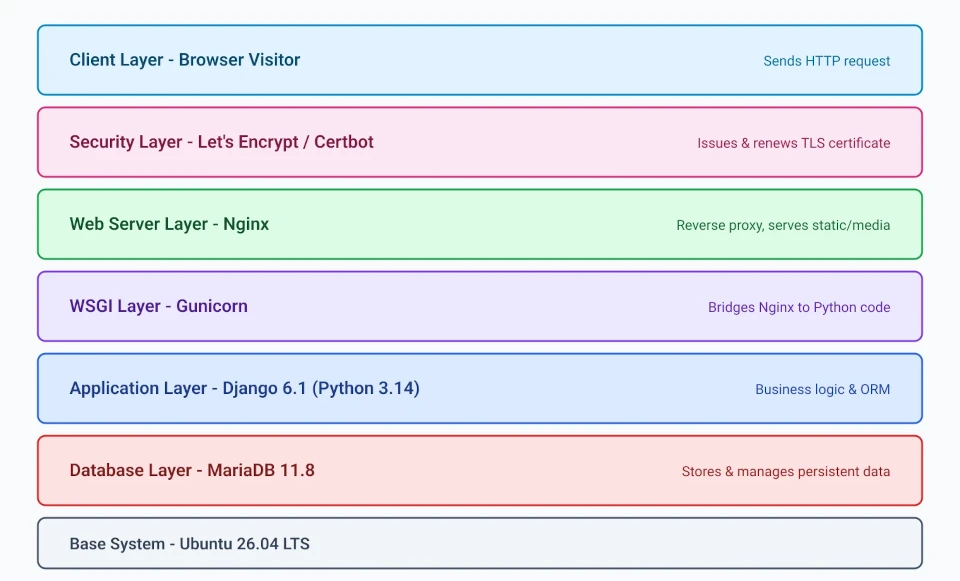
These models streamline troubleshooting: when encountering errors, identify which layer fails first before analyzing specific system logs.
8. Layer-by-Layer Log Troubleshooting
Errors such as 502 Bad Gateway or 500 Internal Server Error can be isolated by checking component logs sequentially from application code out to system infrastructure.
8.1 Django Logs
When running development servers interactively, errors print to console outputs. In systemd production deployments with DEBUG = False, inspect Gunicorn error logs to review uncaught Python exceptions.
8.2 Gunicorn Logs
Because custom log paths were passed to --access-logfile and --error-logfile in step 4.2, application execution logs are stored explicitly in target project log files:
sudo tail -f /var/log/gunicorn/myproject/error.log
sudo tail -f /var/log/gunicorn/myproject/access.log
Systemd service unit events (such as startup failures or restart cycles) can be inspected via journalctl:
sudo journalctl -u myproject-gunicorn
sudo journalctl -u myproject-gunicorn.socket
If Nginx throws a 502 Bad Gateway error, check socket permissions and verify Gunicorn service availability:
ls -l /run/myproject-gunicorn.sock8.3 Nginx Logs
Nginx logs are divided into access and error records. access.log tracks incoming HTTP traffic, while error.log captures proxy failures or file lookup errors:
sudo tail -f /var/log/nginx/access.log
sudo tail -f /var/log/nginx/error.log
Log messages like connect() to unix:/run/myproject-gunicorn.sock failed indicate Gunicorn is stopped or the socket path in Nginx configuration is incorrect.
8.4 MariaDB Logs
Database connection issues present as Python driver exceptions in application logs. To inspect system level database errors, check systemd logs for MariaDB:
sudo journalctl -u mariadb -eOn Ubuntu 26.04, mariadb-server defaults to logging errors to systemd journald rather than file destinations like /var/log/mysql/error.log. To direct log output to an explicit file, add the following setting inside /etc/mysql/mariadb.conf.d/50-server.cnf under section [mariadbd] and restart MariaDB:
log_error = /var/log/mysql/error.logsudo systemctl restart mariadb
sudo tail -f /var/log/mysql/error.log8.5 File Permissions and Firewall Issues
Certain failures occur due to system level permission or networking rules rather than code defects:
- Nginx 403 Forbidden on static assets: Indicates
www-datalacks read permissions across target paths. Ensure permissions are granted properly:mkdir -p /var/www/myproject/staticfiles /var/www/myproject/media sudo chmod -R o+rX /var/www/myproject/staticfiles /var/www/myproject/media - Server inaccessible from external networks: Check UFW firewall configurations (step 5.4) as well as cloud platform external network security groups.
- Root domain (
/) returning 404 errors: Verify route mappings inmyproject/urls.pyto confirm explicit homepage paths exist.
9. Updating Code After Deployment
Deployments require maintenance routines to push application code updates smoothly to production environments without service interruptions.
9.1 When to Restart Gunicorn
Gunicorn loads Python application code into memory at worker startup. Code updates require specific handling depending on asset type:
- Changes to Python files (
views.py,models.py,urls.py,settings.py) require restarting Gunicorn processes. - HTML template updates do not require restarting Gunicorn unless template caching is explicitly enabled.
- Static asset updates (CSS, JS, images) do not require restarting Gunicorn, but do require running
collectstatic.
Standard process restarts are executed using systemctl:
sudo systemctl restart myproject-gunicorn.serviceFor high traffic production services, worker processes can be reloaded gracefully without dropping active connections by sending a SIGHUP signal to Gunicorn:
sudo systemctl kill -s HUP myproject-gunicorn.serviceIf changes affect systemd unit files directly (myproject-gunicorn.service or socket units), reload the systemd daemon first:
sudo systemctl daemon-reload
sudo systemctl restart myproject-gunicorn.service
9.2 Re-running Migrations and Collectstatic
When pulling updates that alter database models or static files, execute maintenance management commands inside the virtual environment:
- Apply database model schema migrations:
python manage.py migrate - Collect updated static assets into destination directories:
python manage.py collectstatic --noinput
9.3 Complete Code Update Sequence
Follow this standard deployment workflow when deploying updates to production servers:
- Navigate to the project root directory and activate the virtual environment:
cd /var/www/myproject source venv/bin/activate - Pull latest updates from source control:
git pull origin main - Update dependency packages if
requirements.txtchanged:pip install -r requirements.txt - Apply database migrations:
python manage.py migrate - Collect static assets:
python manage.py collectstatic --noinput - Restart Gunicorn service processes:
sudo systemctl restart myproject-gunicorn.service
If Nginx configurations were altered, test syntax before reloading the web server:
sudo nginx -t
sudo systemctl reload nginx
Verification: Validate service health by executing HTTP status checks:
curl -I https://example.com/
curl -I https://example.com/admin/
10. Conclusion
The Django application is now deployed across five complementary infrastructure layers: Nginx handles client connections and static media, Gunicorn manages Python WSGI workers via restricted Unix sockets, Django executes business logic, MariaDB handles persistent storage under least-privilege user credentials, and Let's Encrypt secures traffic via HTTPS encryption while UFW locks unneeded network ports. Following this structured architecture ensures maintainable, performant, and secure application operations.