
Reporting data to the Higher Education Database (PDDikti) is a legal obligation for every university in Indonesia, regulated by Minister of Research, Technology, and Higher Education Regulation Number 61 of 2016. Negligence in reporting leads to accreditation obstacles, blocking of diploma numbers, and administrative sanctions from the Ministry of Higher Education, Science, and Technology. Neo Feeder is present as the latest generation reporting solution that replaces the old PDDikti Feeder version.
This article guides the step-by-step installation process of Neo Feeder on a VPS Ubuntu: starting from server preparation, Docker installation, installer file preparation, firewall configuration, Nginx reverse proxy setup, to importing the prefill file for initial data initialization.
What is Neo Feeder?
Neo Feeder is a university data management and reporting application launched by the Directorate General of Higher Education, Research, and Technology on February 25, 2022. This application is a complete overhaul of PDDikti Feeder version 4.1, changing the architecture from monolithic to Docker-based microservices. This means each service component runs as an independent container that is easier to update, monitor, and restart without disrupting the entire system.
Neo Feeder supports various operating systems: Windows, Ubuntu Linux, and macOS. Data reported through Neo Feeder is used by many national systems, including: SIVIL, SISTER, SIM TENDIK, KIP, SAPTO BAN-PT, SimLitabmas, and as a requirement for university accreditation.
Many PDDikti operators run Neo Feeder on the campus local computer. This approach has drawbacks: it depends on working hours, is often disrupted by power outages, and makes data synchronization difficult outside office hours.
VPS offers several advantages relevant to this need:
- Uptime 24/7: The server runs continuously without depending on a local computer.
- Static public IP: Facilitates firewall configuration and access from anywhere.
- Subdomain access: Through Nginx reverse proxy, Neo Feeder can be accessed via URL like https://feeder.kampus.ac.id.
Preparation and System Requirements
Minimum VPS Specifications
| Component | Minimum | Recommended |
|---|---|---|
| OS | Ubuntu 22.04 LTS | Ubuntu 24.04 LTS |
| RAM | 1 GB | 2 GB |
| Storage | 20 GB SSD | 40 GB+ SSD |
| CPU | 1 vCPU | 2 vCPU |
| Connection | 100 Mbps | 100 Mbps+ |
Required Devices and Accounts
- SSH terminal application: Termius, Putty (Windows), or the built-in terminal on macOS and Linux.
- SFTP application: FileZilla or WinSCP to upload the installer file from the local computer to the VPS.
- PDDikti Admin Account: Access to https://pddikti-admin.kemdiktisaintek.go.id/ is required to download the Neo Feeder Linux installer file and the university prefill file.
- Domain or subdomain (optional): The existence of this domain is required if you want to use SSL-based Nginx reverse proxy. Example:
feeder.kampus.ac.id.
Portal Access Note: Users can only access the portal
pddikti-kemdiktisaintek.go.idusing an official university account that is already registered with the Ministry. You must ensure the login credentials are available before starting this process.
Limited Time: Vultr Is Giving Away $300 Credits
Grab $300 NowStep 1: Update Server and Install Docker
Why Docker?
The latest version of Neo Feeder uses Docker container technology. Each service such as the backend application, PostgreSQL database, and frontend runs in separate containers managed by Docker Compose. This approach makes installation more consistent and the update process easier to perform.
Update Repository and System Packages
Please login to the VPS via SSH, then run the following commands to ensure all system packages are up to date:
sudo apt update && sudo apt upgrade -yInstall Docker via Script
The fastest and most reliable way to install Docker on Ubuntu is using the convenience script:
curl -fsSL https://get.docker.com | sudo shAfter the installation is complete, add the active user to the docker group so you don't need to use sudo every time you run Docker commands:
sudo usermod -aG docker $USERVerify Docker Installation
Check whether Docker and Docker Compose are installed correctly:
docker --version
docker compose version
The expected output will display the Docker Engine and Docker Compose Plugin versions. In modern installations, Docker Compose is already available as a built-in plugin.
Docker version 29.7.2, build a7dcaa6
Docker Compose version v5.4.0
Step 2: Prepare Installer Files
Download Neo Feeder Files from the Official Portal
- Log in to the Admin PDDikti portal at https://pddikti-admin.kemdiktisaintek.go.id, navigate to the
Pelaporan › Download Aplikasimenu, then download the fresh Docker installer. Patches for updates are also available. - Then go to
Pelaporan › Generate Prefill, generate and download the university prefill file (.prefill). This file contains initial data in the form of university references, study programs, and other configurations required by Neo Feeder for database initialization. The downloaded prefill file is tied to your university code. Do not use another institution's prefill file as it may cause data inconsistencies in PDDikti.
Extract and Copy the Prefill File
- Extract the fresh installer and patch.
- Copy the
appfolder from the patch into the fresh installer folder. - Also copy the
.prefillfile into theprefill_pddiktifolder.
Modify Configuration Files
Open the configuration file docker-compose.yml, delete its contents and insert the configuration below:
services:
  app-pddikti:
    build:
      context: .
      dockerfile: Dockerfile
    container_name: app-pddikti
    restart: unless-stopped
    tty: true
    environment:
      TZ: "Asia/Jakarta"
      SERVICE_NAME: "app"
      SERVICE_TAGS: "1.0.5"
      PGHOST: "localhost"
      PGPORT: 54333
    volumes:
      - './app:/app'
      - './prefill_pddikti:/prefill_pddikti'
      - './nginx/nginx.conf:/etc/nginx/nginx.conf'
      - './nginx/logs/access.log:/var/log/nginx/access.log'
      - './nginx/logs/error.log:/var/log/nginx/error.log'
    networks:
      - app-network
    ports:
      - "8100:8100"
      - "3003:3003"
    depends_on:
      - db-pddikti

  db-pddikti:
    image: postgres:12
    container_name: db-pddikti
    environment:
      TZ: "Asia/Jakarta"
    restart: unless-stopped
    tty: true
    ports:
      - "54333:54333"
    volumes:
      - './pgsql/data:/var/lib/postgresql/data'
    networks:
      - app-network

networks:
  app-network:
    driver: bridge
    ipam:
      driver: default
      config:
        - subnet: 192.167.150.0/24
Open the configuration file Dockerfile, delete its contents and insert the configuration below:
FROM ubuntu:24.04
RUN apt-get update && \
    apt-get install -yq tzdata && \
    ln -fs /usr/share/zoneinfo/Asia/Jakarta /etc/localtime && \
    dpkg-reconfigure -f noninteractive tzdata
RUN apt-get update \
    && apt-get install -y --allow-unauthenticated \
        curl \
        p7zip-full \
        nginx \
        supervisor

RUN curl -sL https://deb.nodesource.com/setup_22.x | bash - && apt-get install -yq nodejs

# Clear cache
RUN apt-get clean && rm -rf /var/lib/apt/lists/*

RUN groupadd www
RUN useradd -ms /bin/bash -g www www

COPY --chown=www:www . .

RUN mkdir -p /var/log/supervisor
RUN chown www:www /var/log/supervisor

# USER www

CMD ["/usr/bin/supervisord"]
Compress the Installer Folder
Compress the contents of the fresh installer folder into a zip named neofeeder.zip, then upload it to the server.
app/
cara-patch.txt
carapenggunaan.txt
docker-compose.yml
Dockerfile
etc/
nginx/
pgsql/
prefill_pddikti/
Step 3: Neo Feeder Installation Process
Extract the neofeeder.zip file:
unzip neofeeder.zip -d neofeederNavigate to the neofeeder folder:
cd neofeederSet execute permission for the server-linux file:
chmod +x app/server-linuxBuild the container and run the service:
docker compose up -dIf successful, it will display a message like this:
✔ Image neofeeder-app-pddikti   Built
✔ Network neofeeder_app-network Created
✔ Container db-pddikti          Started
✔ Container app-pddikti         Started
Verify whether the containers are running:
docker compose psResult:
NAME          IMAGE                   COMMAND                  SERVICE       CREATED              STATUS              PORTS
app-pddikti   neofeeder-app-pddikti   "/usr/bin/supervisord"   app-pddikti   About a minute ago   Up About a minute   0.0.0.0:3003->3003/tcp, [::]:3003->3003/tcp, 0.0.0.0:8100->8100/tcp, [::]:8100->8100/tcp
db-pddikti    postgres:12             "docker-entrypoint.s…"   db-pddikti    About a minute ago   Up About a minute   5432/tcp, 0.0.0.0:54333->54333/tcp, [::]:54333->54333/tcp
Also check the logs:
docker compose logsResult:
db-pddikti  |
db-pddikti  | PostgreSQL Database directory appears to contain a database; Skipping initialization
db-pddikti  |
db-pddikti  | 2026-08-14 15:16:53.938 WIB [1] LOG:  starting PostgreSQL 12.22 (Debian 12.22-1.pgdg120+1) on x86_64-pc-linux-gnu, compiled by gcc (Debian 12.2.0-14) 12.2.0, 64-bit
db-pddikti  | 2026-08-14 15:16:53.938 WIB [1] LOG:  listening on IPv4 address "0.0.0.0", port 54333
db-pddikti  | 2026-08-14 15:16:53.938 WIB [1] LOG:  listening on IPv6 address "::", port 54333
db-pddikti  | 2026-08-14 15:16:53.941 WIB [1] LOG:  listening on Unix socket "/var/run/postgresql/.s.PGSQL.54333"
db-pddikti  | 2026-08-14 15:16:53.974 WIB [1] LOG:  redirecting log output to logging collector process
db-pddikti  | 2026-08-14 15:16:53.974 WIB [1] HINT:  Future log output will appear in directory "log".
app-pddikti  | /usr/lib/python3/dist-packages/supervisor/options.py:474: UserWarning: Supervisord is running as root and it is searching for its configuration file in default locations (including its current working directory); you probably want to specify a "-c" argument specifying an absolute path to a configuration file for improved security.
app-pddikti  |   self.warnings.warn(
app-pddikti  | 2026-08-14 15:16:54,179 CRIT Supervisor is running as root.  Privileges were not dropped because no user is specified in the config file.  If you intend to run as root, you can set user=root in the config file to avoid this message.
app-pddikti  | 2026-08-14 15:16:54,182 INFO supervisord started with pid 1
app-pddikti  | 2026-08-14 15:16:55,185 INFO spawned: 'backend' with pid 7
app-pddikti  | 2026-08-14 15:16:55,187 INFO spawned: 'nginx' with pid 8
app-pddikti  | 2026-08-14 15:16:56,803 INFO success: backend entered RUNNING state, process has stayed up for > than 1 seconds (startsecs)
app-pddikti  | 2026-08-14 15:16:56,803 INFO success: nginx entered RUNNING state, process has stayed up for > than 1 seconds (startsecs)
Try accessing Neo Feeder at http://SERVER-IP:8100.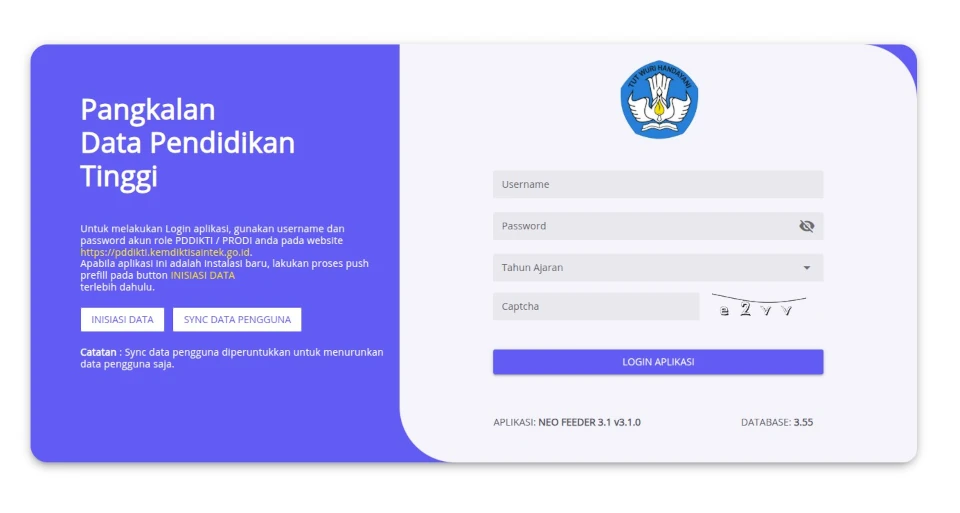
Step 4: Configure Nginx Reverse Proxy and SSL
Configure Reverse Proxy
Install Nginx, Certbot, and the Nginx plugin for Certbot:
sudo apt install nginx certbot python3-certbot-nginx -yNext, create a new Nginx configuration file for the subdomain feeder.kampus.ac.id:
sudo nano /etc/nginx/sites-available/feeder.kampus.ac.id.confEnter the following HTTP configuration into the file:
server {
  listen 80;
  server_name feeder.kampus.ac.id;

  location / {
      proxy_pass http://127.0.0.1:8100;
      proxy_set_header Host $host;
      proxy_set_header X-Real-IP $remote_addr;
      proxy_set_header X-Forwarded-For $proxy_add_x_forwarded_for;
      proxy_set_header X-Forwarded-Proto $scheme;

      proxy_http_version 1.1;
      proxy_set_header Upgrade $http_upgrade;
      proxy_set_header Connection "upgrade";
  }
}
Enable the configuration by creating a symlink to the sites-enabled folder:
sudo ln -s /etc/nginx/sites-available/feeder.kampus.ac.id.conf /etc/nginx/sites-enabled/Test for syntax errors in the Nginx configuration:
sudo nginx -tIf the messages syntax is ok and test is successful appear, restart Nginx:
sudo systemctl reload nginxInstall HTTPS with Certbot
Before running Certbot, make sure the DNS A Record for feeder.kampus.ac.id is pointed to your server's public IP, and ports 80 and 443 are open in the firewall.
Run Certbot to obtain and install the SSL certificate automatically:
sudo certbot --non-interactive \
-m [email protected] \
--agree-tos \
--no-eff-email \
--nginx -d feeder.kampus.ac.id \
--redirect
Message displayed if HTTPS installation is successful:
Deploying certificate
Successfully deployed certificate for feeder.kampus.ac.id to /etc/nginx/sites-enabled/feeder.kampus.ac.id.conf
Congratulations! You have successfully enabled HTTPS on https://feeder.kampus.ac.id
Finally, test accessing https://feeder.kampus.ac.id.
Step 5: Data Initialization and Synchronization
After the Neo Feeder installation is complete, proceed with data initialization and synchronization.
- Enter the
Registration Code, then clickEXECUTE. If the prefill is read correctly, it will display the messageExecute prefill. Wait until it finishes with the final messagePrefill execution has been completed. - Next, log in by entering the PDDikti admin account Username and Password, select the Academic Year, and enter the Captcha.
- After successfully logging in, synchronize the data by clicking the
SYNC DATAbutton.
After finishing, Neo Feeder is ready to use.
Conclusion
Installing Neo Feeder on a VPS Ubuntu using Docker is quite straightforward if done step by step. The PDDikti reporting system can run 24/7, be accessed from anywhere via an HTTPS subdomain, and is more stable than installing it on the campus local computer.