
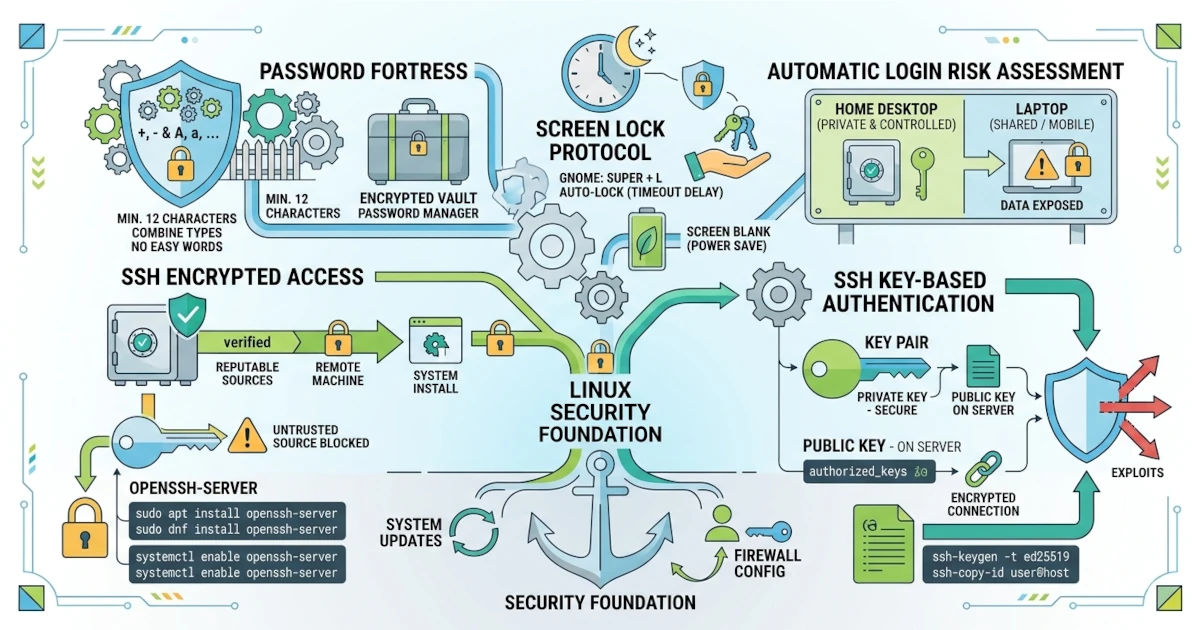
Linux system security relies not only on software updates, but also on our habits in maintaining accounts and access. This chapter covers fundamental account security practices, ranging from choosing a strong password, locking the screen, understanding auto-login risks, to using SSH to securely access machines remotely.
35.1 Strong Passwords
A password is the first line of defense for our account. A weak password is easy to guess manually or crack by an Attacker using brute force attacks. Below are the principles for creating a strong password.
- Use a long password, ideally at least 12 characters.
- Combine uppercase letters, lowercase letters, numbers, and symbols.
- Do not use easily guessable words, such as names, birth dates, or "password".
- Use a different password for every account or service.
Given the sheer number of passwords to remember, consider using a password manager that stores passwords in an encrypted database. Popular choices on the Linux desktop include KeePassXC and Bitwarden, both available via Flatpak on Flathub.
35.2 Screen Lock and Auto-Lock
Locking the screen is a simple habit that is highly effective in preventing others, including Attackers who gain physical access to the device, from accessing our computer when we step away. On GNOME, press the Super + L keys to lock the screen immediately.
Auto-lock automatically locks the screen after a period of inactivity. We can configure it in Settings > Privacy & Security > Screen Lock by enabling Automatic Screen Lock and setting the delay duration before the screen locks.
35.3 Screensaver and Timeout
In addition to auto-lock, the Blank Screen Delay setting determines when the screen turns blank after inactivity. On GNOME, configure it in Settings > Power. There, we can set Screen Blank to disable the display after a few minutes, which also saves power. Ensure the Automatic Screen Lock option is enabled so that a blank screen locks immediately.
35.4 Automatic Login: When It Is Safe and Unsafe
Automatic login allows the computer to boot directly into the desktop without prompting for a password. While this feature saves time, it carries security risks because anyone turning on the computer, including an Attacker who steals or finds our device, can directly access our account.
- Safe to use on computers fully under our control and located in a secure place, such as a personal desktop computer at home.
- Unsafe to use on laptops frequently brought on trips or shared computers, as our data could be exposed. Developers or Users who frequently work mobile from cafes or co-working spaces should disable automatic login and rely on auto-lock instead.
We can configure automatic login in Settings > Users, but use this feature with caution.
35.5 SSH Basics: Secure Login to Remote Machines
SSH (Secure Shell) is a protocol for remotely accessing another machine over an encrypted connection. Through SSH, we can log in to a server or another computer and run commands as if standing right in front of it. Sysadmins rely on SSH every day to manage servers without needing physical access to the machine.
35.5.1 Installing and Enabling the SSH Server
To accept SSH connections, the destination machine must run an SSH server. On Ubuntu 26.04 LTS, install and enable it with:
sudo apt install openssh-serverOn Fedora Workstation 44, use:
sudo dnf install openssh-serverOnce installed, enable and start the service so it runs automatically at boot.
sudo systemctl enable --now sshOn Fedora, the service name is sshd, making the command sudo systemctl enable --now sshd. Once the server is active, other computers can connect using the ssh name@address command.
As a terminal-free alternative, GNOME 50 (used by both Ubuntu 26.04 and Fedora 44) provides a built-in toggle in Settings > System > Secure Shell. Once the openssh-server package is installed, simply turn on the Secure Shell switch in that panel to activate SSH access, complete with a ready-to-use ssh command displayed on the screen according to our device name.
35.5.2 SSH Key-Based Authentication vs Password
By default, SSH prompts for a password upon login. However, a more secure method is key-based authentication, which uses a cryptographic key pair: a private key that we keep secret and a public key placed on the server.
The advantage of key-based authentication is that there are no passwords to be guessed or stolen, and it simplifies login without repeatedly typing a password. We can even disable password-based login once the key is installed for higher security (see the verification steps at the end of this sub-chapter).
In addition to key-based authentication, the SSH connection itself is increasingly hardened at the protocol level. Ubuntu 26.04 LTS includes OpenSSH version 10.2, which by default uses post-quantum hybrid key exchange (mlkem768x25519-sha256). Simply put, when two modern systems with the latest OpenSSH version connect to each other, their SSH session automatically gets an extra layer of protection designed to withstand future quantum computers without requiring any configuration from us.
35.5.3 ssh-keygen: Creating an SSH Key Pair
To generate a key pair, use ssh-keygen. The recommended algorithm today is Ed25519.
ssh-keygen -t ed25519This command will prompt for the key storage location and a passphrase. By default, the private key is stored in ~/.ssh/id_ed25519 and the public key in ~/.ssh/id_ed25519.pub. The passphrase we provide acts as an additional security layer for the private key.
35.5.4 ssh-copy-id: Copying the Public Key to the Server
Once the key is generated, copy the public key to the target server using ssh-copy-id.
ssh-copy-id name@server-addressThis command appends our public key to the ~/.ssh/authorized_keys file on the server. Afterward, we can log in without a password.
35.5.5 Verifying and Troubleshooting SSH Key Login
Before disabling password-based login, ensure that key-based login actually works. Try logging into the server again and observe whether SSH only requests a passphrase (if set up) instead of the account password.
ssh name@server-addressIf SSH still prompts for a password or displays a Permission denied (publickey) message, the most common real-world cause is permissions for the ~/.ssh directory or authorized_keys file being too open. OpenSSH rejects keys stored with overly permissive permissions as part of its strict mode mechanism. Fix it with:
chmod 700 ~/.ssh
chmod 600 ~/.ssh/authorized_keys
To trace issues deeper, append the -v option during login so SSH displays the authentication process in detail.
ssh -v name@server-addressOnce key-based login is confirmed working smoothly, disable password login server-side by editing /etc/ssh/sshd_config, changing the PasswordAuthentication line to no, and reloading the SSH service.
sudo systemctl restart sshOn Fedora, replace the command above with sudo systemctl restart sshd. Sysadmins need to be cautious at this step: disabling passwords before confirming key authentication works risks locking out access to the server, especially if that server is only reachable via SSH.
Maintaining account security is a daily responsibility that must not be ignored. Strong passwords, an always-locked screen, wise use of automatic login, and key-based SSH authentication will protect our system from unauthorized access. In the next chapter, we will complete this security layer by configuring a desktop firewall.