
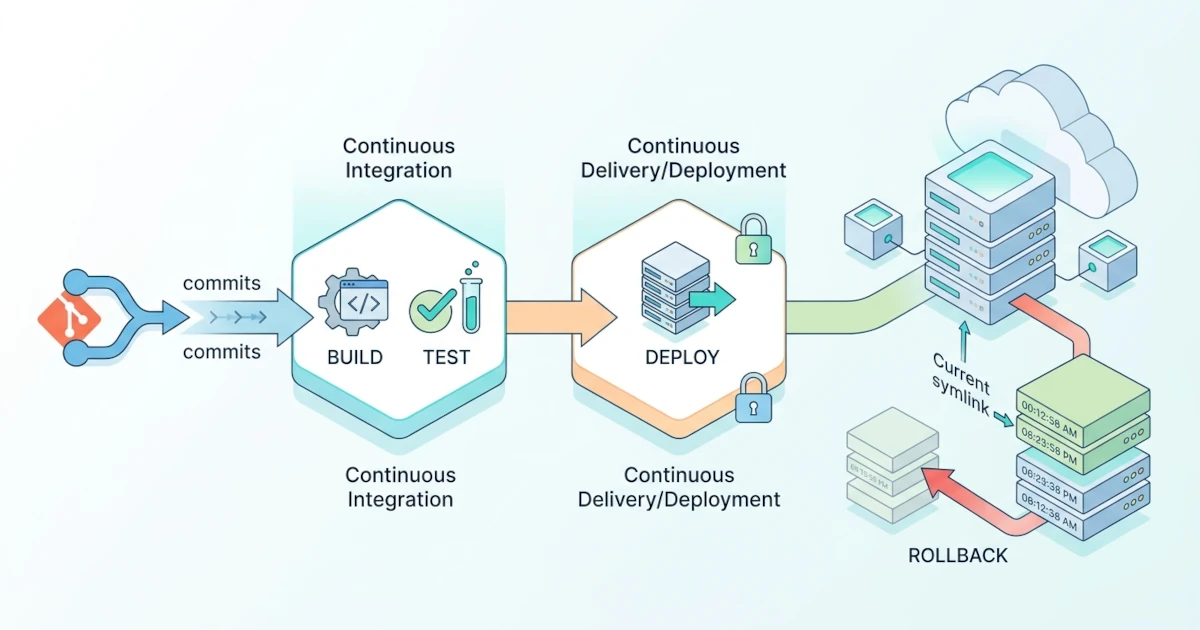
Chapter 41 concludes with a promise: the ready-made Git repository that forms the foundation of a modern developer workflow will be connected to the newly built server through a CI/CD pipeline. The vm-cloud01 instance itself has been cleaned up following the honest cost practices in Section 41.4.4, so this chapter keeps that promise on a server that remains alive throughout this series, namely app01 (192.168.1.40), which was introduced as an Ansible managed node back in Section 36.2.2 and has been running the demo-node application as a systemd service since Section 15.6. All patterns practiced in this chapter, ranging from pipelines, restricted deployment keys, to rollbacks, apply identically even if the deployment target is a public cloud instance such as vm-cloud01, accompanied by one additional networking consideration touched upon in Section 42.4.2.
The scenario underlying this chapter becomes very common as teams grow. Developers have been able to write Node.js application code since Chapter 15, and Sysadmins have been able to automate server configurations using Ansible since Chapter 36, but these two capabilities are still connected manually. The developer finishes coding, sends a message via chat saying "ready to deploy," and then the Sysadmin logs into the server, executes a script or playbook, and hopes no step is forgotten. This process is prone to delays if the Sysadmin is busy or offline, as well as human error due to relying on someone having to type the correct sequence of commands every single time. CI/CD closes this gap by making the git push itself the automated trigger, rather than a chat message waiting for a human response.
This chapter begins with the core concepts of Continuous Integration and Continuous Deployment, followed by the role of Git as the foundation triggering the entire process, and then setting up app01 with a release-based directory structure and intentionally restricted access for automation. The core practical section demonstrates three methods for delivering releases from the repository to the server: manual scripts, GitHub Actions with a self-hosted runner, and Ansible playbooks invoked from a pipeline, before wrapping up with rollback strategies utilizing the same symlink pattern.
42.1 Concepts of Continuous Integration/Continuous Deployment
42.1.1 Continuous Integration: Automatically Merging and Testing Code
Continuous Integration (CI) is the practice of merging code changes from multiple developers into a single shared branch frequently, usually several times a day, where each merge is immediately and automatically tested through a build and test process without waiting for human intervention. Before CI became popular, teams often postponed the code merging process until close to the release schedule, causing conflicts between new changes to be discovered late and making them much harder to resolve. CI reverses that order: merging is performed as frequently as possible, and every merge is immediately verified via an automated pipeline, allowing issues to be detected within minutes rather than weeks.
In practice, a repository that implements CI always has a clear and machine-executable definition of "success," such as "all unit tests pass" or "the build process produces no errors." Section 42.2.3 demonstrates this definition directly on the demo-node application.
42.1.2 Continuous Delivery vs Continuous Deployment
These two terms are often considered identical even though the difference is quite important for Sysadmins responsible for production servers.
- Continuous Delivery means that every change passing the CI stage is automatically prepared until it is fully ready to be released, but the final step to actually push it to the production server still waits for human approval, usually via a single click on a "deploy" button or approval on a pull request.
- Continuous Deployment goes one step further: every change passing the CI stage is immediately released to production without any manual approval gate whatsoever. This speed only makes sense if the test coverage and rollback mechanisms are thoroughly trusted, something built directly in Section 42.5.
This chapter practices a full Continuous Deployment pattern, because a lab with a single server and limited traffic is the safest environment to learn without major risks. In a production environment with live traffic, a combination of Continuous Delivery for major releases and Continuous Deployment for well-tested minor fixes is far more common.
42.1.3 Anatomy of a CI/CD Pipeline and the Sysadmin Position Within It
A CI/CD pipeline is fundamentally a series of automated stages executed sequentially whenever a trigger occurs, typically a git push. The four most common stages encountered, although naming may vary between tools, are build (preparing the application to run, such as npm install), test (running automated tests), deploy (sending the output to the target server), and verify (ensuring the deployed result is truly healthy before considering it complete).
Developers are usually most concerned with the first two stages, ensuring the written code is functionally correct. Sysadmins play the largest role in the last two stages: preparing the target server to accept deployments safely, restricting the access used by the pipeline as tightly as possible, and preparing an exit route if the deployment encounters issues. Sections 42.3 through 42.5 of this chapter fall entirely within the realm of those Sysadmin responsibilities.
42.2 Git as the Foundation of Deployment Workflows
42.2.1 Why Git Commits Are the Single Source of Truth for Releases
Section 36.1.1 introduced the problem of configuration drift in server configurations, and the exact same issue occurs in application code when there is no single source of truth. Without Git, "the version running on the server" could be the result of a manual scp that has been overwritten multiple times with patched files directly on the server, without a clear history of who changed what and when. Git closes this gap by making every commit a permanently recorded unit of change with a unique identity (SHA hash), so that "the version currently running on the server" can always be answered definitively with a specific commit hash, not a guess.
This chapter assumes readers are already familiar with basic Git commands such as git add, git commit, and git push, as the focus here is how Git connects to the deployment pipeline, rather than a Git tutorial from scratch.
42.2.2 Trunk-Based Development vs Git-Flow for Automated Deployment
How a team organizes Git branches directly affects how smoothly CI/CD can operate. The two most frequently compared patterns are trunk-based development and Git-Flow.
| Aspect | Trunk-Based Development | Git-Flow |
|---|---|---|
| Primary branch | Single branch (main), serves as the direct source of deployment | Multiple permanent branches (main, develop) plus separate release branches |
| Feature branch lifespan | Short, ideally less than a day before merging | Can be long-lived until the feature is completely finished |
| Suitability for Continuous Deployment | High, each merge into main immediately represents a release candidate | Low, requires an additional merge step into a release branch first |
| Primary risk | Unripe code might get deployed if not assisted by feature flags | Large merge conflicts accumulate due to long-lived branches |
The pipeline built in this chapter adopts a trunk-based pattern, where every push to the main branch immediately triggers a deployment. This pattern is intentionally chosen because it aligns with the Continuous Deployment discussed in Section 42.1.2; long-lived feature branches in the style of Git-Flow delay the primary value of CI/CD, which is rapid feedback once code is merged.
42.2.3 Preparing the demo-node Repository and Pushing to GitHub
The demo-node application that has been running as a service on app01 since Section 15.6.2 has never been saved in Git at all; its source code exists only in /opt/demo-node/server.js on that server. This section creates its repository, while adding a small amount of structure to server.js so that there is logic that can actually be tested automatically during the CI stage.
Practical Steps
- On our workstation (not on
app01), create a new project directory and initialize Git.mkdir ~/demo-node && cd ~/demo-node git init - Create
server.js, continuing the code from Section 15.6.1, with a slight refactor so that the response-building function can be imported and tested separately from thelistenprocess.nano server.js - Fill it with the following code.
Theconst http = require('http'); const os = require('os'); const port = process.env.PORT || 3000; function buildResponseText(hostname, date) { return `Node.js active on ${hostname}, server time: ${date.toISOString()}\n`; } const server = http.createServer((req, res) => { res.writeHead(200, { 'Content-Type': 'text/plain' }); res.end(buildResponseText(os.hostname(), new Date())); }); if (require.main === module) { server.listen(port, () => { console.log(`Server running on port ${port}`); }); } module.exports = { buildResponseText };if (require.main === module)block ensuresserver.listenonly runs when the file is executed directly vianode server.js, exactly as used byExecStartin the systemd unit from Section 15.6.2, but does not run when imported as a module by tests. - Create a minimal
package.json, just enough to register the test command.nano package.json - Fill it with the following configuration.
The{ "name": "demo-node", "version": "1.0.0", "private": true, "scripts": { "test": "node --test" } }node --testcommand uses the built-in Node.js test runner (thenode:testmodule), which has been stable since recent LTS versions, avoiding the need to install third-party test framework dependencies for an example this simple. - Create a test directory and the first test file.
mkdir test nano test/server.test.js - Fill it with a simple test for
buildResponseText.const test = require('node:test'); const assert = require('node:assert'); const { buildResponseText } = require('../server'); test('buildResponseText includes hostname and ISO date format', () => { const sample = new Date('2026-08-28T00:00:00.000Z'); const text = buildResponseText('app01', sample); assert.match(text, /app01/); assert.match(text, /2026-08-28T00:00:00\.000Z/); }); - Run tests locally before committing, ensuring the future CI stage has a proven baseline.
node --test - Commit all files, then create a new repository on GitHub (private, because Section 42.4.2 will run a self-hosted runner which official GitHub documentation advises against attaching to public repositories), and push.
git add server.js package.json test/
git commit -m "Initialize demo-node with basic test"
git branch -M main
git remote add origin [email protected]:contoh-user/demo-node.git
git push -u origin main
Verification and Troubleshooting
- A healthy output from
node --testdisplays a summary of# pass 1and# fail 0. A failure on the secondassert.matchline usually means the date argument passed tobuildResponseTextis not a validDateobject. - Replace
[email protected]:contoh-user/demo-node.gitwith your own repository URL. Agit pushcommand failing withPermission denied (publickey)means your GitHub account does not have an SSH key registered yet, following a pattern similar to key-based authentication in Section 3.2.2, except the key is registered in GitHub account settings rather than a server'sauthorized_keys.
42.3 Preparing app01 as a Deployment Target
42.3.1 Migration to a Release-Based Directory Structure
The /opt/demo-node/server.js structure used since Chapter 15 was sufficient for learning systemd, but it is unsuitable for repeated deployments: directly overwriting server.js while a new release is deploying leaves a brief window where the old process reads partially overwritten files. A much safer pattern, widely used by deployment tools like Capistrano and practiced manually in this section, is placing each release in its own directory and pointing a single symlink named current to the active release.
Practical Steps
Execute all the following steps on app01.
- Temporarily stop the running service before modifying its structure.
sudo systemctl stop demo-node.service - Create the
releasesdirectory, then move the existingserver.jsinto the first release directory, named using the current timestamp.sudo mkdir -p /opt/demo-node/releases RELEASE_ID=$(date +%Y%m%d%H%M%S) sudo mkdir "/opt/demo-node/releases/$RELEASE_ID" sudo mv /opt/demo-node/server.js "/opt/demo-node/releases/$RELEASE_ID/" - Create the
currentsymlink pointing to this first release.sudo ln -sfn "/opt/demo-node/releases/$RELEASE_ID" /opt/demo-node/current - Align ownership of the entire new structure to the
nodeappuser created in Section 15.6.2.sudo chown -R nodeapp:nodeapp /opt/demo-node - Adjust the systemd unit to point to the
currentsymlink rather than a static path.sudo nano /etc/systemd/system/demo-node.service - Modify the
WorkingDirectoryandExecStartlines to match the following, leaving other lines unchanged from Section 15.6.2.WorkingDirectory=/opt/demo-node/current ExecStart=/usr/bin/node /opt/demo-node/current/server.js - Reload systemd and restart the service.
sudo systemctl daemon-reload
sudo systemctl start demo-node.service
Verification and Troubleshooting
- Test with
curlas usual to verify the application continues running normally after the structural migration.curl http://localhost:3000 - The command
readlink -f /opt/demo-node/currentshould display the full path to the first release directory, proving the symlink is set up correctly. - A failure of
systemctl startwith a message mentioningMODULE_NOT_FOUNDor path not found almost always indicates a typo in step 6's path, or that step 7's daemon-reload was skipped, causing systemd to use the old unit definition from its cache.
42.3.2 Creating a Deploy User with Restricted SSH Keys (Forced Command)
The CI pipeline needs a way to log into app01 without human intervention. Handing a Sysadmin's personal SSH key to an automated pipeline, as was briefly done for human convenience in Section 41.2.3, is not a secure practice in this context: if the pipeline credentials leak, all access held by that key is compromised. The solution is a dedicated user and key restricted strictly to a single task: receiving new releases.
Practical Steps
- Create a system user named
deployonapp01, without interactive login shell permissions.sudo useradd --system --create-home --shell /usr/sbin/nologin deploy - Create the
.sshdirectory for this user with proper permissions.sudo -u deploy mkdir -m 700 /home/deploy/.ssh - On our workstation (or on the control node used in Section 42.4.2), generate a new key pair specifically for deployment, separate from the Sysadmin's personal key.
ssh-keygen -t ed25519 -f ~/.ssh/deploy_demo_node -C "deploy-ci@demo-node" -N "" - Copy the contents of
~/.ssh/deploy_demo_node.pub, and onapp01, write theauthorized_keysfor thedeployuser using a forced command option that restricts this key to running only one specific script.sudo -u deploy nano /home/deploy/.ssh/authorized_keys - Add the following single line, replacing the
ssh-ed25519 AAAA...portion with the actual public key string.command="/opt/demo-node/deploy.sh",no-agent-forwarding,no-port-forwarding,no-pty,no-X11-forwarding ssh-ed25519 AAAA... deploy-ci@demo-node - Lock down the permissions for this file and directory according to OpenSSH requirements.
sudo chmod 600 /home/deploy/.ssh/authorized_keys
sudo chown -R deploy:deploy /home/deploy/.ssh
Verification and Troubleshooting
- The
command=option inauthorized_keysis officially documented in thesshd(8)manual page under AUTHORIZED_KEYS FILE FORMAT: any command sent by the client over SSH will be ignored, and the server will always execute/opt/demo-node/deploy.shinstead. This means even if this key leaks, an attacker can at most trigger the deployment script itself, rather than gaining an open shell onapp01. Theno-ptyoption is safe to use here because the payload delivery process relies purely on streaming data over stdin, requiring no interactive terminal. - The script
/opt/demo-node/deploy.shreferenced in this line is not created until Section 42.3.3 is complete; connection attempts before that script exists will fail with aNo such file or directorymessage, which is expected temporarily.
42.3.3 Writing deploy.sh and Sudoers for Service Restarts
This section writes the script that is actually executed every time the deploy user receives an SSH connection. This script is intentionally kept out of the demo-node repository and is never overwritten by incoming release contents, because the release payload is extracted into a new sub-directory inside releases/, rather than overwriting /opt/demo-node itself. This separation is crucial: changes to the deployment script remain entirely under the Sysadmin's control via direct SSH access to app01, rather than through commits to the application repository by anyone.
Practical Steps
- Prepare the
releasesdirectory with an active setgid bit and group set tonodeapp, so that every new release directory created by thedeployuser is automatically readable by thenodeappuser running the service, without needing a separatechowncommand on every deploy.
The setgid bit (thesudo chown deploy:nodeapp /opt/demo-node/releases sudo chmod 2775 /opt/demo-node/releases2at the start of the mode) causes newly created subdirectories withinreleasesto automatically inherit the parent directory'snodeappgroup rather than the primary group of the user creating it, which is default Linux filesystem behavior when this bit is enabled. - Create the
deploy.shfile, owned by root so it cannot be modified by thedeployuser.sudo nano /opt/demo-node/deploy.sh - Fill it with the following script.
The command#!/bin/bash set -euo pipefail RELEASES_DIR=/opt/demo-node/releases CURRENT_LINK=/opt/demo-node/current KEEP_RELEASES=5 RELEASE_DIR="$RELEASES_DIR/$(date +%Y%m%d%H%M%S)" mkdir -p "$RELEASE_DIR" tar -xzf - -C "$RELEASE_DIR" ln -sfn "$RELEASE_DIR" "$CURRENT_LINK.tmp" mv -T "$CURRENT_LINK.tmp" "$CURRENT_LINK" sudo /usr/bin/systemctl restart demo-node.service cd "$RELEASES_DIR" ls -1 | sort -r | tail -n +$((KEEP_RELEASES + 1)) | xargs -r rm -rf --tar -xzf -reads compressed archives directly from stdin, making it ideal to pair with CI sending repository contents through an SSH pipe, as practiced in Section 42.4.1. The symlink swap is intentionally written in two steps, creating a temporarycurrent.tmpsymlink and moving it overcurrentviamv -T, becauserename()on the same filesystem is guaranteed atomic by POSIX, whereas recreating a symlink directly on top of an existing name (ln -sfnwithout a move step) leaves a brief window with no symlink at all. Release directory names use theYYYYMMDDHHMMSStimestamp format so they can be sorted lexicographically viasort -r, independent of filesystem modification time metadata which could drift. - Grant execution permissions. The
deploygroup referenced here does not need to be created separately, becauseuseraddin Section 42.3.2 step 1 automatically creates a group with the same name as the user as its primary group, which is default Ubuntu behavior as long as theUSERGROUPS_ENABsetting in/etc/login.defsis not changed fromyes.sudo chmod 750 /opt/demo-node/deploy.sh sudo chown root:deploy /opt/demo-node/deploy.sh - The
sudo systemctl restartline inside the script requires elevated privileges that thedeployuser does not have. Create a new sudoers rule following thesudoers.d/convention used since Section 4.2.2, restricted specifically to this single command.sudo visudo -f /etc/sudoers.d/deploy-demo-node - Add the following single line.
deploy ALL=(root) NOPASSWD: /usr/bin/systemctl restart demo-node.service
Verification and Troubleshooting
- The sudoers rule above intentionally avoids wildcards like
systemctl *orALL, following the principle of least privilege discussed in Section 34.2.1: thedeployuser can only restart one specific service and nothing more, even if its credentials leak. - Using
sudo visudo -fin step 5 validates the file syntax before saving, preventing typos that could break the entiresudomechanism on the server, a habit just as critical as validatingcloud-init schemain Section 41.2.3. - This section cannot be tested end-to-end until a CI runner actually sends a release; full testing is conducted in Section 42.4.1.
42.4 Simple Deployment: From Repository to Server
42.4.1 Manual Testing: Sending Releases via Tar over SSH
Before handing this process over to an automated pipeline, test it manually from your workstation first, using the exact same approach used in Section 36.3.2 to test Ansible connectivity via ad-hoc commands prior to writing actual playbooks.
Practical Steps
- From the
~/demo-nodedirectory created in Section 42.2.3, package the entire project contents into a compressed tar archive, excluding the.gitdirectory which does not need to be deployed, and stream it directly over SSH toapp01using the deployment key from Section 42.3.2.tar czf - --exclude=.git . | ssh -i ~/.ssh/deploy_demo_node [email protected]
Verification and Troubleshooting
- The command above produces no output on success, matching the design of
deploy.shwhich writes nothing to stdout. Verify success viacurlas usual.curl http://192.168.1.40:3000 - Check that a new release directory has indeed been created and that the symlink has shifted.
Note that thessh -i ~/.ssh/deploy_demo_node [email protected] readlink -f /opt/demo-node/currentreadlink -f /opt/demo-node/currentargument passed here is actually ignored entirely by the server due to thecommand=behavior explained in Section 42.3.2; this command will still executedeploy.shand send an empty release payload (since no tar is streamed this time). To inspect the symlink without triggering a deployment, executereadlink -f /opt/demo-node/currentdirectly from a standard Sysadmin SSH session, not via the deploy key. - A
Permission deniederror means the public key does not match theauthorized_keysline from Section 42.3.2. Atar: This does not look like a tar archiveerror on the server side typically means the connection was interrupted mid-stream before the payload sent completely.
42.4.2 Automating Triggers with GitHub Actions Self-Hosted Runner
The manual command in Section 42.4.1 works, but still requires someone to type it every time a new release is ready, which is the exact problem described at the beginning of this chapter. This section installs a GitHub Actions self-hosted runner on the same control node used for Ansible since Chapter 36, allowing the runner to execute the tar and ssh commands automatically whenever code is pushed to the main branch.
Practical Steps
- On the
demo-noderepository page on GitHub, navigate to Settings > Actions > Runners > New self-hosted runner, select Linux OS and x64 architecture. Copy the exactcurland./config.shcommands shown on that page without copying from external sources, as those commands contain the latest runner version number and a single-use registration token unique to your repository and session. - Execute those copied commands on the control node. The general pattern looks as follows (replace
VERSIONandTOKENvalues with those shown by GitHub).mkdir actions-runner && cd actions-runner curl -o actions-runner-linux-x64.tar.gz -L \ https://github.com/actions/runner/releases/download/vVERSION/actions-runner-linux-x64-VERSION.tar.gz tar xzf ./actions-runner-linux-x64.tar.gz ./config.sh --url https://github.com/contoh-user/demo-node --token TOKEN - Install the runner as a systemd service using the built-in script provided by the runner package itself, following the same principles as custom service units in Section 5.2.
sudo ./svc.sh install sudo ./svc.sh start - Copy the contents of the deployment private key from Section 42.3.2 (
~/.ssh/deploy_demo_node, not the.pubfile), and add it as a repository secret namedDEPLOY_SSH_KEYvia Settings > Secrets and variables > Actions > New repository secret. This key is intentionally never stored as a permanent file on the control node or anywhere outside GitHub; the workflow step in the next step reconstructs it as a temporary file for the duration of a single execution and deletes it immediately afterward. - Back on your workstation, create the workflow file.
mkdir -p .github/workflows nano .github/workflows/deploy.yml - Fill it with the following definition.
This sequence explicitly runs tests prior to sending the release; ifname: Deploy demo-node to app01 on: push: branches: [main] jobs: deploy: runs-on: self-hosted steps: - name: Checkout code uses: actions/checkout@v4 - name: Run tests run: node --test - name: Send release via SSH env: DEPLOY_KEY: ${{ secrets.DEPLOY_SSH_KEY }} run: | install -m 600 /dev/null /tmp/deploy_key echo "$DEPLOY_KEY" > /tmp/deploy_key tar czf - --exclude=.git . | \ ssh -i /tmp/deploy_key -o StrictHostKeyChecking=accept-new [email protected] rm -f /tmp/deploy_keynode --testfails, the workflow stops at that step and the deployment step is never executed, which is a concrete application of Continuous Integration as discussed in Section 42.1.1 preventing faulty code from reaching deployment. - Commit and push this workflow file to the
mainbranch.git add .github/workflows/deploy.yml git commit -m "Add deployment pipeline to app01" git push
Verification and Troubleshooting
- The Actions tab on the GitHub repository displays the execution history for the workflow on every push to
main, complete with logs for each step. A green status indicates all steps, including release delivery, succeeded; click failed runs to see exactly which step halted. - An honest security note must be emphasized here. A self-hosted runner executes workflow commands directly on the control node's operating system under the privileges of the user running the runner service, rather than inside an isolated sandbox environment like GitHub-hosted runners. Official GitHub documentation explicitly advises against using self-hosted runners on public repositories, because anyone who can open a pull request could potentially inject malicious commands into the workflow and run them on your machine. The
demo-noderepository in this chapter is private, but this risk is still why Sections 42.3.2 and 42.3.3 intentionally restrict what the deployment credentials can execute via forced commands and narrow sudoers rules, rather than relying solely on repository privacy as a defense layer. - If the control node resides on a different network from
192.168.1.0/24or the deployment target is a public cloud instance likevm-cloud01in Chapter 41, two common approaches exist: installing this same self-hosted runner on a network that can reach the target server via SSH directly (matching this chapter's pattern), or using GitHub-hosted runners (runs-on: ubuntu-latest) running on GitHub cloud infrastructure, which requires opening cloud security groups (Section 41.3.2) to GitHub Actions public IP ranges published via GitHub's meta API, a maintenance task more complex than allowing a single fixed internal control node IP.
42.4.3 Alternative: Invoking Ansible Playbooks from the Pipeline
The tar-over-SSH approach in Section 42.4.2 works well for a single server, but as the number of managed nodes grows as described in Chapter 36's opening scenario, rewriting symlink logic and release cleanup on every server becomes redundant. Since Ansible is already installed on the control node from Chapter 36, the most natural evolution is not rewriting deployment from scratch, but having CI invoke a playbook following the same pattern as install-nginx.yml in Section 36.4.1.
Practical Steps
- In the existing
~/ansible-projectdirectory from Chapter 36, create a new playbook.cd ~/ansible-project nano deploy-demo-node.yml - Fill it with the following definition.
The module--- - name: Deploy latest demo-node release hosts: webservers become: true vars: release_id: "{{ lookup('pipe', 'date +%Y%m%d%H%M%S') }}" release_path: "/opt/demo-node/releases/{{ release_id }}" app_src: "{{ playbook_dir }}/../demo-node/" tasks: - name: Create new release directory ansible.builtin.file: path: "{{ release_path }}" state: directory owner: deploy group: nodeapp mode: "2775" - name: Copy source code to release directory ansible.posix.synchronize: src: "{{ app_src }}" dest: "{{ release_path }}/" rsync_opts: - "--exclude=.git" - name: Point current symlink to new release ansible.builtin.file: src: "{{ release_path }}" dest: /opt/demo-node/current state: link force: true - name: Restart demo-node service ansible.builtin.systemd: name: demo-node.service state: restarted - name: Clean up old releases, keep latest 5 ansible.builtin.shell: | cd /opt/demo-node/releases && ls -1 | sort -r | tail -n +6 | xargs -r rm -rf -- changed_when: falseansible.posix.synchronizewrapsrsyncand belongs to theansible.posixcollection, which has been installed via theansiblemetapackage since Section 36.2.1. This playbook requires fullbecome: trueon the managed node, a broader scope of privilege compared to the narrow restart-only sudoers rule in Section 42.3.3, which is a natural consequence of using the same Ansible user used for overall server configuration rather than a dedicated deploy user. Theapp_srcvariable is separated into a overrideable default because the location of source code copied by this task varies depending on who executes the playbook: when run manually from the control node, the default{{ playbook_dir }}/../demo-node/is correct assuming~/demo-nodesits alongside~/ansible-project; when called from GitHub Actions, the runner's checkout does not reside at that path, but rather in the workspace directory of that job. - Replace the "Send release via SSH" step in
deploy.ymlfrom Section 42.4.2 with an invocation of this playbook, running from thedemo-nodecheckout in the runner workspace. Overrideapp_srcusing the-eflag pointing to$GITHUB_WORKSPACE, an environment variable built into GitHub Actions that points to the checkout directory of the active job, preventing Ansible from accidentally pulling source code from the Sysadmin's manual session directory at~/demo-node.- name: Deploy with Ansible run: | ansible-playbook -i ~/ansible-project/inventory.ini \ ~/ansible-project/deploy-demo-node.yml \ -e "app_src=$GITHUB_WORKSPACE/"
Verification and Troubleshooting
- Run this playbook manually once from the control node before relying on it in CI, following the ad-hoc testing pattern from Section 36.4.2. This manual run intentionally omits the
-e app_src=...flag, as the defaultapp_srcvalue in the playbook is appropriate for this environment.
A successfulansible-playbook -i inventory.ini deploy-demo-node.ymlPLAY RECAPdisplayschanged=4on initial execution (four tasks actively altered server state), with somechangedcounters dropping on subsequent runs for idempotent tasks such as directory creation. - The two approaches in Sections 42.4.2 and 42.4.3 present clear trade-offs: the tar-over-SSH script with forced commands limits blast radius if credentials leak, making it ideal for one or two critical servers. Ansible scales to multiple servers without rewriting deployment logic, but hands broader
becomeprivileges to the CI pipeline. Choose based on server count and trust level in the pipeline itself, rather than tool preference alone.
42.5 Basic Rollback Strategy
42.5.1 Atomic Symlink Swap as the Foundation of Fast Rollbacks
A rollback is the process of reverting an application to a previous release version when a new release proves problematic. The release-based directory structure built in Section 42.3.1 makes rollbacks extremely inexpensive: because old releases remain intact in releases/ until pruned during cleanup in Section 42.3.3, a rollback simply requires redirecting the current symlink to a previous release directory and restarting the service, requiring no rebuilds or re-fetching code from Git.
Contrast this with a naive deployment pattern that overwrites files directly in place: rolling back under that pattern requires re-deploying the full set of older files from scratch, a much slower process during the exact moment speed is needed most when production is broken.
42.5.2 The rollback.sh Script and Maintaining Release History
Unlike routine deployments which can be fully automated, a rollback usually involves a conscious decision by a Sysadmin, as rolling back means acknowledging a problem with the latest release that requires code-level investigation. Consequently, rollback.sh in this section is executed manually via standard sudo access, rather than through deployment keys restricted by forced commands as in Section 42.3.2.
Practical Steps
- On
app01, create therollback.shfile.sudo nano /opt/demo-node/rollback.sh - Fill it with the following script.
The selection logic for#!/bin/bash set -euo pipefail RELEASES_DIR=/opt/demo-node/releases CURRENT_LINK=/opt/demo-node/current CURRENT_RELEASE=$(basename "$(readlink -f "$CURRENT_LINK")") PREVIOUS_RELEASE=$(cd "$RELEASES_DIR" && ls -1 | sort -r | grep -v "^${CURRENT_RELEASE}$" | head -n1) if [ -z "$PREVIOUS_RELEASE" ]; then echo "No previous release available for rollback." >&2 exit 1 fi echo "Rolling back from $CURRENT_RELEASE to $PREVIOUS_RELEASE" ln -sfn "$RELEASES_DIR/$PREVIOUS_RELEASE" "$CURRENT_LINK.tmp" mv -T "$CURRENT_LINK.tmp" "$CURRENT_LINK" systemctl restart demo-node.servicePREVIOUS_RELEASEuses the same directory name sorting technique as the cleanup script in Section 42.3.3, taking the newest entry that is not the currently active release. - Grant execution permissions, owned by root because this script is executed via
sudo.sudo chmod 750 /opt/demo-node/rollback.sh sudo chown root:root /opt/demo-node/rollback.sh
Verification and Troubleshooting
- Execute a rollback and confirm the outcome.
sudo /opt/demo-node/rollback.sh curl http://localhost:3000 - The message
No previous release available for rollbackexiting with a non-zero status is intended behavior, preventing the script from attempting to roll back to a non-existent release during initial deployments. - Because the cleanup script in Section 42.3.3 retains only the five most recent releases, rolling back via this script allows reverting one step to the immediately preceding release. Reverting to older releases requires relying on Git: checking out an older commit and running the deployment process in Section 42.4 like a standard new release.
42.5.3 Closing the Gap with Health Checks Before Automated Rollback
This chapter keeps rollbacks manual, but mature production pipelines typically go a step further: adding a health check step immediately after deployment, calling application endpoints via curl just like the verification steps practiced throughout this series, and invoking rollback.sh automatically if health checks fail across multiple attempts. This pattern distinguishes fully trusted Continuous Deployment from unmonitored automated deployment, as mentioned in Section 42.1.2.
This chapter stops at manual rollbacks as a baseline foundation, because automated health checks require application-specific definitions of "healthy" beyond an introductory CI/CD scope. The core principle remains identical to running systemctl status and reading logs as covered since Chapter 5, except the trigger is executed automatically by a pipeline rather than typed manually by a Sysadmin.
At this point, the demo-node application on app01 has a complete deployment workflow: code is stored in Git as a single source of truth, CI pipelines test every change before touching production servers, two deployment paths (restricted script and Ansible) are ready to select as needed, and rollbacks can be executed in seconds using atomic symlink patterns. This pipeline remains intentionally minimal, suitable for one application and one target server, without addressing zero-downtime multi-server deployments or blue-green strategies common in large production environments. Chapter 43 concludes this series with a topic that accompanies any automated system: troubleshooting, including handling pipeline failures in the middle of the night without direct Sysadmin intervention.