
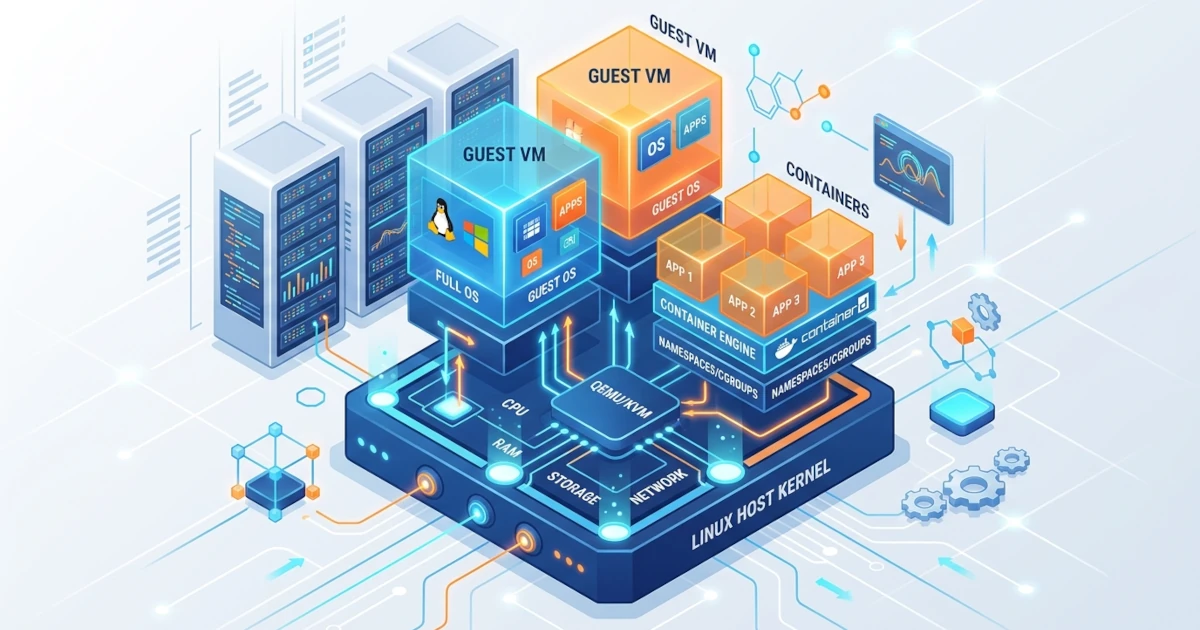
Chapter 26 and Chapter 27 close the container discussion with one important limitation that was intentionally left unresolved: every Docker container continues to share the same kernel as its host, as already touched upon in Section 26.1. This limitation is barely noticeable for daily requirements such as running web servers or databases, but it becomes a serious issue when Sysadmins are faced with far stricter requirements. What if a Developer needs to test an application on top of another Linux kernel version that differs from the production host? What if a team needs to run Windows Server for a legacy application, while all other infrastructure runs on Ubuntu? Or what if corporate security policy mandates full isolation between tenants, down to the kernel level, rather than mere namespaces and cgroups as the container foundation? Containers cannot answer these three scenarios, because by nature they share a kernel rather than running independent kernels. Chapter 28 answers these needs through KVM (Kernel-based Virtual Machine), a full virtualization technology built into the Linux kernel, paired with QEMU as a device emulation engine and libvirt as a management layer above both. This chapter starts from basic hypervisor concepts, continues with installing the KVM/QEMU/libvirt stack on Ubuntu Server 26.04 LTS, creating the first virtual machine headlessly via virt-install, and closes the chapter with daily operations using virsh, including snapshots for fast rollbacks.
28.1 Type 1 vs Type 2 Hypervisors: Foundations of Full Virtualization
Before diving into installation, we need to understand where KVM stands compared to other hypervisors we might have heard of, such as VMware ESXi or VirtualBox, as well as why its architecture is slightly unusual compared to both.
28.1.1 From Containers to Full Virtualization: Separate Kernel for Each Guest
Containers, as we practiced throughout Chapters 26 and 27, isolate processes using namespaces and cgroups on top of the same kernel. Full virtualization takes a far more extreme approach, where each virtual machine (abbreviated VM, often called a guest) runs its own kernel in its entirety, complete with device drivers, memory management, and its own scheduler, as if running on real physical hardware. A software component called a hypervisor is tasked with creating and managing this virtual hardware, from CPU, RAM, storage, to network interfaces, then sharing it with each guest in isolation.
The consequences of this kernel-level isolation are quite significant. A VM is much heavier than a container, both in terms of boot time (tens of seconds to minutes, not milliseconds) and resource consumption, because each VM must load its own kernel and full operating system processes. In return, a VM gains much stronger security isolation and complete freedom in choosing the guest operating system, two non-negotiable items for containers.
28.1.2 Type 1 (Bare Metal) vs Type 2 (Hosted) Hypervisors
Virtualization literature generally divides hypervisors into two types based on their position relative to hardware and the operating system.
| Aspect | Type 1 (Bare Metal) | Type 2 (Hosted) |
|---|---|---|
| Position | Runs directly on hardware, without a host OS in between | Runs as an application on top of an existing host OS |
| Examples | VMware ESXi, Microsoft Hyper-V, Xen | VirtualBox, VMware Workstation, Parallels Desktop |
| Performance | Lower overhead, more direct hardware access | Higher overhead due to going through the host OS |
| Common use cases | Data centers, production servers, cloud providers | Development desktops, local testing |
This two-type division has been used since classic virtualization literature from the 1970s, long before Linux and KVM existed. The issue is that KVM does not fit neatly into either category in a pure sense, and the next section explains why.
28.1.3 KVM as a Linux Kernel That Becomes a Hypervisor
KVM is not a separate hypervisor application that needs to be installed like ESXi, but rather a kernel module (kvm.ko along with kvm_intel.ko or kvm_amd.ko depending on the CPU vendor) built directly into the Linux kernel since version 2.6.20. Once this module is active, the running Linux kernel itself acts as a hypervisor, using the hardware virtualization extension features of the CPU (Intel VT-x or AMD-V) to execute guest instructions almost directly on the physical CPU, rather than translating them one by one through slow software emulation.
Because of this position, KVM is often referred to as a Type 1 hypervisor running inside a general-purpose OS, instead of a pure Type 1 that lacks a host OS entirely like ESXi. The Ubuntu Server host we are managing can still be used for other purposes outside virtualization, something that does not apply to ESXi, which is strictly dedicated as a hypervisor. KVM itself only provides basic CPU and memory execution capabilities. It does not emulate BIOS, graphics cards, disk controllers, or virtual network cards, which is where QEMU steps in. QEMU is a full machine emulator providing all these virtual devices, while leveraging KVM as an accelerator so guest CPUs run near native speed, rather than fully emulated which is much slower. The combination of both is commonly called KVM/QEMU, almost always running side by side on Ubuntu Server.
One final layer completing this stack is libvirt, a management API and daemon sitting on top of QEMU. Without libvirt, managing VMs means invoking the qemu-system-x86_64 binary directly with dozens of complex command-line flags for every VM. libvirt hides this complexity behind XML-based VM definitions and virsh commands that are much easier to manage, while serving as the uniform API layer used by higher-level tools such as virt-install, virt-manager, up to cloud platforms like OpenStack.
28.1.4 Checking Hardware Virtualization Support
KVM can only be activated if the host CPU supports and enables hardware virtualization extensions. This step must be checked first before proceeding to installation, because without this support, VMs can still be created but will run through full software emulation which is extremely slow and practically unusable for real needs.
Practical Steps
- Check if the CPU supports Intel VT-x (
vmx) or AMD-V (svm).grep -Ec '(vmx|svm)' /proc/cpuinfo - Install
cpu-checkerto obtain thekvm-oktool, which provides a more comprehensive diagnosis than merely reading/proc/cpuinfo.sudo apt update sudo apt install cpu-checker - Run a complete check.
sudo kvm-ok
Verification and Troubleshooting
- A number greater than
0from thegrepcommand above indicates that the CPU supports virtualization. A value of0means the CPU lacks support, or the feature is still disabled in the host BIOS/UEFI. - Healthy output from
kvm-okdisplaysINFO: /dev/kvm existsfollowed byKVM acceleration can be used. - If
INFO: Your CPU does not support KVM extensionsappears, the host CPU indeed lacks hardware virtualization support; stop here as the KVM installation will not function optimally. - If the message
KVM acceleration can NOT be usedappears alongside the lineINFO: KVM (vmx) is disabled by your BIOS(orsvmfor AMD CPUs), it means the CPU supports virtualization but the feature is disabled in firmware. Enter the host BIOS/UEFI and enable the option named Intel VT-x, Intel Virtualization Technology, or AMD-V depending on the motherboard vendor, then perform a hard power off/on, not just a soft reboot, so the firmware actually re-reads the setting. - Here is an important field note for servers that are actually VMs in the cloud or inside another hypervisor (for instance, a cloud provider VM, or a VM inside VirtualBox as mentioned in Section 2.4): KVM inside KVM is called nested virtualization and is not always active by default. Certain cloud providers offer specific instance types with active nested virtualization (usually marked by "bare metal" or "nested KVM" features), while others disable it completely for multi-tenant security reasons. If
kvm-okfails inside a VM, check the provider's documentation regarding nested virtualization support before assuming the hardware lacks support.
28.2 Installing KVM, QEMU, and libvirt on Ubuntu Server 26.04 LTS
Once hardware support is confirmed, this section installs the entire virtualization stack while setting up secure operational access for non-root users.
28.2.1 Required Packages and Their Respective Roles
Practical Steps
- Install all core packages in a single command.
sudo apt update
sudo apt install qemu-system-x86 qemu-utils libvirt-daemon-system libvirt-clients virtinst
Each package above has a specific role that should be understood, rather than installed blindly.
| Package | Role |
|---|---|
qemu-system-x86 | QEMU machine emulator binary for the x86_64 architecture, core of VM execution |
qemu-utils | Supporting utilities such as qemu-img to create and manage virtual disk files |
libvirt-daemon-system | Collection of libvirt management daemons alongside their systemd services |
libvirt-clients | Client tools such as virsh to interact with the libvirt daemon |
virtinst | Collection of VM provisioning tools, including virt-install and virt-clone |
Some older tutorials still include the bridge-utils package in this list. That package is obsolete, replaced by ip link and bridge commands from iproute2 pre-installed in Ubuntu Server. libvirt-daemon-system itself in recent releases no longer carries a dependency on bridge-utils, as libvirt manages the virbr0 bridge directly via netlink without calling the brctl binary at all.
Verification and Troubleshooting
- Confirm the installed versions of QEMU and libvirt.
Ubuntu Server 26.04 LTS ships with QEMU 10.2 and libvirt 12.0 in theqemu-system-x86_64 --version virsh versionmainrepository as a fully supported baseline throughout the LTS lifecycle. For those requiring newer virtualization features without waiting for the next LTS release, Canonical also provides an optional virtualisation HWE stack (packagesqemu-hweandlibvirt-hwe) updated alongside interim releases, which is outside the scope of this chapter.
28.2.2 Modular libvirt Daemon: virtqemud Replacing libvirtd
This section is crucial to understand as it is a common pitfall for Sysadmins accustomed to older tutorials. Since Ubuntu 24.04 LTS, the libvirt-daemon-system package no longer relies on a single monolithic libvirtd daemon for all tasks. Instead, libvirt is now split into multiple modular daemons, each handling a specific driver, following systemd socket activation so unused daemons do not need to run continuously in the background.
| Daemon | Responsibility |
|---|---|
virtqemud | Management of QEMU/KVM-based VMs, the primary daemon interacted with directly |
virtnetworkd | Virtual networking, including the default NAT network |
virtstoraged | Storage pools and virtual disk volumes |
virtnwfilterd | Firewall rules for inter-VM traffic |
virtproxyd | Compatibility proxy for legacy clients still looking for the classic libvirtd socket, as well as the remote access gateway |
In practice, we rarely need to interact with each daemon individually, since virsh and virt-install automatically communicate with the correct daemon via virtproxyd. However, understanding this architectural shift is important so you do not get confused when an old tutorial instructs running sudo systemctl restart libvirtd and throws an error instead.
Practical Steps
- Check the socket status of the main daemon handling QEMU/KVM.
systemctl status virtqemud.socket
Verification and Troubleshooting
- A status of
active (listening)indicates the socket is ready to receive connections, and thevirtqemuddaemon itself only fully runs (active (running)) once the first client connects, conforming to the socket activation model. - If attempting
sudo systemctl restart libvirtdresults in the errorFailed to start libvirtd.service - libvirt legacy monolithic daemon, this does not indicate a broken installation. The error simply signifies that the system has migrated to modular daemons, and the correct command to restart issudo systemctl restart virtqemud.
28.2.3 Non-root Access via libvirt and kvm Groups
By default, libvirt operations over the qemu:///system socket require root privileges. Adding administrative users to the following two groups saves us from the bad habit of typing sudo in front of every virsh command.
Practical Steps
- Add the current active user to the
libvirtandkvmgroups.sudo usermod -aG libvirt,kvm $USER - Apply group membership changes without requiring a full logout, effective for the current active shell session.
newgrp libvirt
Verification and Troubleshooting
- Confirm successful connection to libvirt without
sudo.virsh list --all - Group changes applied via
usermodonly take full effect in a new SSH session. Thenewgrpcommand merely patches the currently active session; for absolute certainty, especially across other open sessions, logging out and back in remains safer. - If
virsh list --allstill displays the errorFailed to connect socket ... Permission denied, verify group membership usinggroups $USER, and remember that members of thesudogroup actually receive full access automatically via polkit even if not explicitly added to thelibvirtgroup.
28.2.4 Default NAT Network and Storage Pool
libvirt prepares two basic resources used by almost every VM: networking and virtual disk storage. Both need to be verified as active before creating the first VM.
Practical Steps
- Check the status of the default network named
default.virsh net-list --all - If the
defaultnetwork status is inactive, start it and enable autostart so it remains active after host reboots.virsh net-start default virsh net-autostart default - Check the storage pool used for virtual disk files.
virsh pool-list --all - If no pool named
defaultexists, create a directory-based pool pointing to the standard path/var/lib/libvirt/images.virsh pool-define-as default dir --target /var/lib/libvirt/images virsh pool-build default virsh pool-start default virsh pool-autostart default
Verification and Troubleshooting
- A healthy network displays the
defaultrow with statusactiveandyesin theAutostartcolumn. This network is built on a virtual bridge namedvirbr0, assigning each VM a private IP address via an automatically runningdnsmasqinstance, then forwarding outbound traffic via NAT to the physical host interface, similar to home router behavior.ip addr show virbr0 - A healthy storage pool also displays
activestatus in the corresponding column. Unlike thedefaultnetwork which is almost always present automatically after package installation, thedefaultpool on several Ubuntu installations is not defined automatically, making the manual steps above frequently necessary rather than mere precautions. - All
virshcommands above succeed withoutsudobecause the user was added to thelibvirtgroup back in Section 28.2.3. Ubuntu's default polkit configuration grants group members full access toqemu:///system, not just read-only access, allowing definition-modifying operations likepool-define-asto work without explicit root privileges. - If you prefer LVM as a storage pool backend instead of standard directories (for example, to leverage LVM snapshots as discussed in Section 7.2), libvirt also supports the
logicalpool type, which falls outside the basic configuration scope of this chapter.
28.3 Creating a Virtual Machine with virt-install
This section practices creating your first VM completely headless via command line, ideal for servers without monitors or GUIs, while being significantly easier to repeat and automate compared to manual installations using virtual optical drives as demonstrated in Section 2.4.
28.3.1 Downloading ISO and Inspecting os-variant
Practical Steps
- Download the Ubuntu Server 26.04 LTS ISO directly into the storage pool directory, identical to what was downloaded from
ubuntu.com/download/serverin Section 2.1.cd /var/lib/libvirt/images sudo wget https://releases.ubuntu.com/26.04/ubuntu-26.04-live-server-amd64.iso - Install
libosinfo-binto obtain theosinfo-querycommand. This package is not automatically installed viavirtinstin Section 28.2.1, becausevirtinstonly includes Python bindings to libosinfo, not its command-line tools.sudo apt install libosinfo-bin - Check whether the local osinfo database, which is the database libvirt uses to apply optimal configurations per guest operating system, recognizes Ubuntu 26.04.
osinfo-query os | grep -i ubuntu26
Verification and Troubleshooting
- If the line
ubuntu26.04does not appear because the server'sosinfo-dbpackage has not been updated, do not force that value manually. Use the flag--os-variant detect=on,require=offonvirt-installin the next step, which instructs libvirt to detect the OS automatically from the ISO while preventing hard failures if detection is uncertain.
28.3.2 Headless VM Installation via Serial Console
The following virt-install command creates a new VM and immediately boots the Subiquity installer from ISO, routing output to the serial console instead of VNC, allowing you to follow along directly from an SSH session to the host without additional VNC client software.
Practical Steps
- Run
virt-installwith a 20 GB disk, 2 GB RAM, and 2 vCPUs.virt-install \ --name vm-app01 \ --memory 2048 \ --vcpus 2 \ --disk path=/var/lib/libvirt/images/vm-app01.qcow2,size=20,bus=virtio,format=qcow2 \ --os-variant detect=on,require=off \ --network network=default,model=virtio \ --graphics none \ --console pty,target_type=serial \ --location /var/lib/libvirt/images/ubuntu-26.04-live-server-amd64.iso,kernel=casper/vmlinuz,initrd=casper/initrd \ --extra-args="console=ttyS0,115200n8 --- console=ttyS0,115200n8"
Several flags above warrant detailed explanation. The --disk flag uses bus=virtio, a paravirtualized storage driver that is significantly faster than full IDE/SATA controller emulation, because modern guest OSs like Ubuntu Server ship with the virtio driver natively. The --location flag points directly to the casper/vmlinuz and casper/initrd paths inside the ISO, which is the directory structure characteristic of casper-based installers used by Ubuntu live-server in recent releases, instead of using --cdrom which merely boots the ISO as-is without piping installation output to the serial console. The --extra-args flag contains two kernel arguments separated by a triple hyphen (a standard pattern for casper-based images), where the section before the triple hyphen becomes installer parameters and the section after is passed to the live-boot process itself; both need to be set to console=ttyS0,115200n8 so all boot stages, rather than just part, render consistently on the serial console.
Note that the virt-install command above runs without sudo, unlike wget in Section 28.3.1 which still requires sudo to write files into root-owned /var/lib/libvirt/images directory. This difference is not coincidental. wget writes files directly to the filesystem as the executing user, whereas virt-install merely sends requests over a socket to the virtqemud daemon running as root, and that daemon actually creates the vm-app01.qcow2 file in the storage pool. As long as the user belongs to the libvirt group as configured in Section 28.2.3, socket-based requests are sufficiently authorized without requiring root privileges on the client side.
28.3.3 Completing Subiquity Installation via Serial Console
virt-install automatically connects the current terminal to the VM console once the boot process begins, presenting the exact same Subiquity installer familiar from Section 2.2, except now displayed as a TUI (text user interface) over serial console rather than a virtual optical drive screen.
Practical Steps
- Follow the entire Subiquity flow identically to Section 2.2, starting from language selection, network configuration, disk partitioning, up to initial user account creation.
- After installation completes and Subiquity presents the reboot option, press
Ctrl+]to detach from the console session without shutting down the VM, as an automatic reboot from the installer will immediately boot the newly installed system rather than returning to the installer like the risk highlighted in Section 2.4. - Reconnect to the VM console after a brief moment to ensure the first boot proceeds smoothly.
virsh console vm-app01
Verification and Troubleshooting
- A standard Ubuntu Server login prompt appearing on the console confirms that installation and initial boot succeeded completely.
- Unlike manual installation via virtual optical drive in Section 2.4 which forced manual detachment of the ISO to prevent booting back into the installer, the
--locationapproach here never attaches the ISO as a permanent CD-ROM on the VM to begin with, eliminating that problem altogether. - If the serial console screen appears completely blank from initial boot, it is highly likely one of the two
console=ttyS0,115200n8arguments in--extra-argswas omitted or mistyped. Remove the failed VM and retry from step 28.3.2.virsh destroy vm-app01 virsh undefine vm-app01 --remove-all-storage
28.3.4 virt-manager as a GUI from a Client Machine
Production servers rarely install desktop environments, but Sysadmins can still manage VMs visually using virt-manager, a GUI executed from client machines (the Sysadmin's own laptop/desktop) rather than installed on the server.
Practical Steps
- On an Ubuntu/Debian-based client machine, install
virt-manager.sudo apt install virt-manager - Open virt-manager, select File > Add Connection, then fill in SSH connection details to the server, taking advantage of SSH key-based access configured since Chapter 3.
qemu+ssh://username@server-ip-address/system
Verification and Troubleshooting
- Upon successful connection, all VMs created via
virt-installon the server, includingvm-app01, appear immediately in the virt-manager list, complete with real-time CPU and memory usage graphs. - The
qemu+ssh://connection utilizes SSH tunneling entirely, requiring no extra open ports on the server firewall beyond the SSH port already open since Chapter 3. - If the connection fails with messages indicating
virshorpolkitwas not found on the server side, ensure the SSH login user belongs to thelibvirtgroup as configured in Section 28.2.3.
28.4 Day-to-Day VM Management with virsh
With the first VM up and running, this section covers common daily operations needed by Sysadmins, from basic lifecycles to snapshots for rapid rollback.
28.4.1 VM Lifecycle
| Command | Function |
|---|---|
virsh list --all | Lists all VMs along with their status, including powered-off VMs |
virsh start vm-app01 | Powers on a VM currently in shut off state |
virsh shutdown vm-app01 | Sends a graceful shutdown signal to the guest OS |
virsh reboot vm-app01 | Restarts the guest OS gracefully |
virsh destroy vm-app01 | Forcibly powers off equivalent to pulling the power plug, risking corruption of unsaved data |
virsh undefine vm-app01 | Removes the VM definition from libvirt without deleting its disk files |
Practical Steps
- Shut down the VM gracefully and wait until its status actually changes.
virsh shutdown vm-app01 virsh list --all - Power it back on.
virsh start vm-app01
Verification and Troubleshooting
- A frank note on risk:
virsh shutdownrelies on the ACPI agent inside the guest OS to respond to shutdown signals. If the guest hangs or stops responding after some time,virsh destroyserves as a last resort, identical to pulling the power plug on physical hardware, carrying the exact same risks. - Running
virsh undefinealone does not delete thevm-app01.qcow2file in the storage pool. Add the--remove-all-storageflag if you intend to permanently delete the VM along with all disk data, ensuring no important data requires backing up first, following backup strategy principles from Chapter 23.
28.4.2 VM Autostart on Host Boot
Practical Steps
- Enable autostart so
vm-app01starts automatically whenever the host Ubuntu Server reboots.virsh autostart vm-app01
Verification and Troubleshooting
- Confirm autostart status.
The linevirsh dominfo vm-app01 | grep AutostartAutostart: enableindicates the configuration is active. - To disable autostart, run
virsh autostart vm-app01 --disable.
28.4.3 Viewing and Modifying VM Resources
Practical Steps
- View the complete VM definition in XML format, including disk, network, and CPU settings.
virsh dumpxml vm-app01 - Edit the VM definition directly using your default editor (defined by
$EDITOR), useful for advanced configurations unavailable via standardvirshflags.virsh edit vm-app01 - Increase vCPUs and RAM for the next boot, without altering the currently running configuration.
virsh shutdown vm-app01
virsh setvcpus vm-app01 4 --config
virsh setmem vm-app01 4G --config
virsh start vm-app01
Verification and Troubleshooting
- Confirm that changes were applied.
virsh dominfo vm-app01 - The
--configflag modifies definitions used during the next VM power-on, not running states. Certain resources like CPU support live adjustments without rebooting via the--liveflag, but are bounded by maximum values defined during initial VM creation, while requiring hotplug support from the guest OS itself. Safely increasing resources beyond initial capacity generally requires redefining the VM viavirsh editor combining--config --livesimultaneously. - Never allocate total RAM across all VMs exceeding physical host RAM without careful calculations. Neither libvirt nor KVM prevents memory overcommit by default, and a host running out of physical memory triggers the OOM killer which can abruptly terminate VM processes rather than merely slowing them down.
28.4.4 VM Snapshots for Fast Rollback
Snapshots save the VM disk state at a specific point in time, enabling fast rollbacks prior to high-risk changes such as application upgrades or guest kernel patching—a concept similar to LVM snapshots in Section 7.2, except operating at the virtual disk file qcow2 level.
Practical Steps
- Create a snapshot before performing high-risk changes inside the VM.
virsh snapshot-create-as vm-app01 pre-upgrade "State prior to package upgrade" - List stored snapshots.
virsh snapshot-list vm-app01 - If changes cause issues, revert the VM to the snapshot state.
virsh snapshot-revert vm-app01 pre-upgrade - Delete unnecessary snapshots so they do not accumulate and inflate
qcow2file size.virsh snapshot-delete vm-app01 pre-upgrade
Verification and Troubleshooting
- Using
snapshot-create-aswithout additional flags creates an internal snapshot, stored inside the sameqcow2file. This is the simplest method for short-term rollbacks like upgrade tests, but less suitable for long-term backup strategies due to single disk file dependency; the VM should ideally be in ashut offstate when taking snapshots to ensure filesystem consistency. - For mature production requirements, such as live VM snapshots without downtime, libvirt supports external snapshots which separate new disk files from old base images, falling outside the basic scope of this chapter.
- Snapshots are not backup replacements. Snapshots remain stored in the same storage pool as the original VM, meaning host physical disk failure still results in losing the VM along with all its snapshots simultaneously. Always combine with off-site backup strategies discussed in Chapter 40.
At this point, we understand KVM's position as a Linux kernel-based hypervisor, installed the full KVM/QEMU/libvirt stack along with its modular daemons, created our first VM headlessly via virt-install, and managed its lifecycle and snapshots using virsh. Full virtualization via KVM delivers the strongest isolation among all approaches discussed, but at the expense of higher resource overhead compared to containers. Chapter 29 returns to a lighter approach via LXD/Incus, namely system containers providing a VM-like experience complete with init systems and multi-processes inside, while staying light as containers by sharing the kernel with the host—positioning itself right between Docker which we have mastered and KVM which we just learned.